

How to Clean and Sterilize Aesthetic Tools
Properly cleaning and sterilizing aesthetic tools protects your clients from infections and ensures your practice meets health standards. Tools that aren’t sanitized can harbour harmful pathogens like Hepatitis B, HIV, and Salmonella. This guide explains how to clean, disinfect, and sterilize tools step-by-step to keep them safe for use.
Key Steps:
- Clean tools with warm water and detergent to remove visible debris like oils and blood.
- Disinfect using chemical agents like 70% isopropyl alcohol for tools that contact intact skin.
- Sterilize high-risk tools (e.g., microneedling tips) using methods like autoclaving or UV sterilizers.
- Organize your workspace to avoid cross-contamination and use personal protective equipment (PPE).
- Inspect and Maintain tools regularly to ensure they remain in good condition.
Quick Facts:
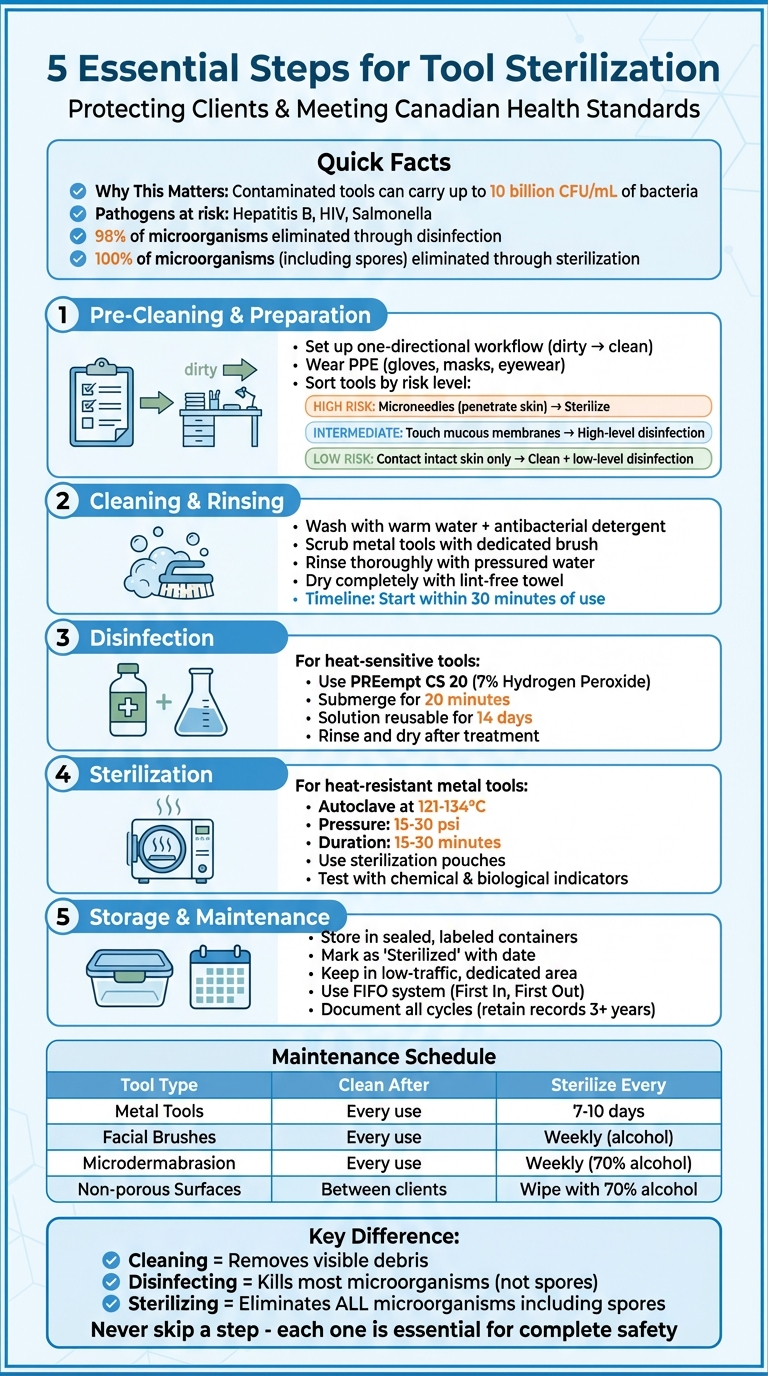
- Contaminated tools can carry up to 10 billion CFU/mL of bacteria.
- Disinfection removes most microorganisms but doesn’t kill spores.
- Sterilization eliminates all microorganisms, including spores, ensuring complete safety.
Following these steps builds trust with clients, protects their health, and keeps your tools compliant with Canadian health standards.
5-Step Process for Cleaning and Sterilizing Aesthetic Tools
Sanitizing Beauty Tools - Salon Secrets
Using a professional UV sterilizer cabinet ensures your tools remain decontaminated between client sessions.
sbb-itb-8ec3e54
Cleaning, Disinfecting, and Sterilizing: What's the Difference?
Meeting Canadian health and safety standards requires a solid understanding of these processes. Each step plays a crucial role in reducing contamination, and skipping even one can compromise the entire safety protocol.
Cleaning: Removing Visible Debris
Cleaning focuses on getting rid of visible debris like organic matter, blood, and oils from tool surfaces. Using warm water and detergent, this step removes contaminants that could shield microorganisms from further treatments. It’s the essential first step in proper reprocessing.
Disinfecting: Killing Most Microorganisms
Disinfection takes things further by using chemical agents to kill most microorganisms, including viruses, bacteria, and fungi. High-level disinfectants like ethanol, isopropanol, and hydrogen peroxide can eliminate over 98% of microorganisms. However, this process doesn’t remove resistant forms such as bacterial spores. Disinfection is ideal for intermediate-risk tools that come into contact with intact skin but don’t penetrate it. A common choice for quick surface treatment of non-porous tools is 70% isopropyl alcohol.
Sterilizing: Eliminating All Microorganisms
Sterilization is the most thorough process, ensuring the removal of all microorganisms, including spores. This step is essential for high-risk tools that penetrate the skin or come into contact with blood - like microneedling tips, extraction tools, and instruments used in invasive procedures. Methods such as autoclaves, UV sterilizer cabinets, and gamma radiation are commonly used. Sterilization guarantees tools are completely safe for reuse. Many Canadian aesthetic practices also reduce risks by opting for single-use components during high-risk procedures, while sterilizing reusable stainless steel implements and storing them in professional trays.
Understanding these processes is the foundation for effective tool reprocessing and ensures safety at every step.
Step 1: Pre-Cleaning and Preparation
Getting ready is essential to avoid cross-contamination and ensure tools are reprocessed properly. This step is all about organizing your workspace, protecting yourself, and sorting tools based on their infection risk.
Setting Up Your Workspace
Start by creating a dedicated workflow where items move in one direction - from dirty to clean. This setup helps keep contaminated tools away from sterilized ones. Use hospital-grade disinfectants to clean surfaces; household cleaners aren't strong enough for this task. Make sure your workspace has good lighting, running water, and all the supplies you need within easy reach before you begin.
Wearing Personal Protective Equipment (PPE)
PPE is your shield against harmful germs when handling contaminated tools and hygiene chemicals. Before starting, assess the risks to choose the right gear. At the very least, wear chemical-resistant gloves. Depending on the residue you're dealing with, masks and protective eyewear might also be necessary. Regular training on how to use PPE correctly is crucial - it not only protects you but also ensures compliance with infection prevention and control (IPAC) standards required in Canadian aesthetic practices.
Sorting Tools by Risk Level
Divide tools into categories based on their level of contact risk: high, intermediate, or low.
- High-risk (critical) tools, like microneedles that penetrate the skin, must be sterilized.
- Intermediate-risk (semi-critical) tools, which touch mucous membranes or non-intact skin, need high-level disinfection.
- Low-risk (non-critical) tools, which only come into contact with intact skin, require cleaning and low-level disinfection.
Check for the "do not reuse" symbol on packaging - a "2" in a circle with a bar through it - and discard single-use items immediately. Always refer to the manufacturer's instructions to confirm the correct reprocessing method for each tool.
Once your workspace is ready, PPE is on, and tools are sorted, you can move on to cleaning and rinsing.
Step 2: Cleaning and Rinsing Tools
Thorough cleaning is essential to remove debris from tools before moving on to disinfection or sterilization. Even the most effective sterilizer can't work its magic on tools with residue build-up.
Washing with Detergent and Warm Water
Start by washing tools in warm, soapy water with an antibacterial detergent. For metal tools like comedone extractors or cuticle pushers, use a small, dedicated brush to scrub away any biological material, especially in crevices. For tighter spots, a Q-tip dipped in rubbing alcohol can help.
When it comes to brushes, handle them more delicately. Swish the bristles gently in lukewarm soapy water - avoid hot water, as it can weaken the adhesive holding the bristles. For makeup sponges, massage them with mild soap and rinse under running water until the water runs clear.
Rinsing and Drying
Rinse everything thoroughly to remove all traces of soap. For tools with small crevices, use pressured water to flush out any remaining debris. Dry the tools with a clean, lint-free towel, and then allow them to air-dry completely. Trapped moisture can encourage bacteria to grow quickly.
For brushes, lay them flat on a clean towel with the bristles hanging off the edge of a counter. This helps them maintain their shape and speeds up drying. Once everything is completely dry, the tools are ready for disinfection or sterilization in a sterilization tray.
Cleaning Non-Immersible Tools
Electrical devices and heated styling tools need a slightly different approach to avoid damaging their internal components. Always unplug the device first. Use a soft, damp cloth or cotton rounds dipped in 70% isopropyl alcohol to wipe away product build-up. Follow this with a damp cloth to remove any alcohol residue, then air-dry.
For eyelash curlers, clean the surfaces with a makeup wipe or a cotton ball soaked in rubbing alcohol. Rinse with warm water to remove any residue and let them air-dry overnight.
| Tool Type | Recommended Cleaning Method | Specific Considerations |
|---|---|---|
| Metal Tools | Scrub with antibacterial soap and a small brush | Use pressured water to dislodge debris first |
| Facial/Makeup Brushes | Swish in lukewarm soapy water | Avoid hot water to protect the bristle adhesive |
| Makeup Sponges | Massage with mild soap and rinse under running water | Continue until water runs completely clear |
| Electrical Devices | Wipe with a damp cloth or alcohol-based wipe | Never submerge in water to avoid motor damage |
Once your tools are clean and dry, you're ready to move on to the next step: disinfection and sterilization.
Step 3: Disinfection and Sterilization Methods
Once your tools are clean and dry, the next step is to eliminate any microorganisms. The method you choose depends on the type of tools and the level of risk they pose during use.
Using High-Level Disinfectant Solutions
For tools that can’t handle the heat of autoclaving - like certain plastics or delicate instruments - PREempt CS 20 is a reliable option. This 7% Accelerated Hydrogen Peroxide solution can disinfect stainless steel and hard plastic tools, such as nail clippers, cuticle pushers, tweezers, and comedone extractors, in just 20 minutes.
Here’s how to use it:
- Make sure your tools are completely dry before submerging them to avoid diluting the solution.
- Submerge the tools entirely in the solution for 20 minutes. This ensures high-level disinfection, as the solution is sporicidal, tuberculocidal, and fungicidal. It effectively handles microorganisms like Mycobacterium terrae and fungi such as Trichophyton interdigitale.
- The solution can be reused for up to 14 days, but always test its effectiveness with AHP7 Test Strips. If the solution is visibly dirty or the test strips indicate a drop in hydrogen peroxide concentration, discard it immediately.
- After soaking, rinse the tools thoroughly and dry them with a clean, lint-free cloth.
For tools that can withstand high temperatures, autoclaving is another excellent option for sterilization.
Sterilizing with Autoclaves
When it comes to heat-resistant metal instruments, autoclaving offers a thorough sterilization solution. Autoclaves use high-pressure steam at temperatures between 121°C and 134°C to destroy all microbial life. Once the required temperature and pressure (15 to 30 psi) are reached, sterilization typically takes 15 to 30 minutes.
Steps for effective autoclaving:
- Pre-clean the tools to ensure steam can penetrate effectively.
- Arrange instruments in a single layer on trays or use self-sealing sterilization pouches, leaving enough space for proper steam circulation.
- Use chemical indicators (like Class 4 pouches) and biological indicators (such as spore tests) regularly to confirm the autoclave is working correctly.
- Conduct routine maintenance checks every month, and schedule professional inspections every 6 to 12 months.
Proper post-sterilization storage is just as important to maintain the tools' safety.
Storing Sterilized Tools
To keep sterilized tools safe from contamination, store them in clean, sealed containers or self-sealing sterilization pouches clearly marked "Sterilized." Ensure the tools are completely dry before sealing, as moisture can encourage bacterial growth. For added protection, keep these containers in a low-traffic, dedicated area to reduce the risk of cross-contamination.
For high-quality sterilization supplies and accessories, consider checking out the range of products available at Beauty Pro Supplies Canada. They offer solutions tailored to support effective cleaning and sterilization practices.
Step 4: Creating a Maintenance Schedule
Once disinfection and sterilization are complete, the next step is establishing a consistent maintenance schedule. This schedule helps keep tools hygienic, safe, and compliant with industry standards and spa equipment requirements. Cleaning frequency should be tailored to how often tools are used and their associated risk levels. Incorporating daily and weekly routines can prevent buildup and ensure tools remain in optimal condition.
Daily and Weekly Cleaning Routines
Cleaning tools promptly is crucial - biofilm can start forming within minutes. Experts often recommend beginning the cleaning process within 30 minutes of use to prevent organic material from hardening, which makes it more challenging to remove.
Here’s a straightforward guide based on the type of tool and its usage:
| Tool Type | Cleaning Frequency | Disinfection/Sterilization Frequency |
|---|---|---|
| Metal Tools (Tweezers/Extractors) | After every use | Sterilize every 7–10 days, or after each use if stock is limited |
| Facial/Body Brushes | After every use (soap & water) | Weekly deep clean with alcohol |
| Microdermabrasion Tools | After every use | Weekly deep clean with 70% alcohol |
| Non-porous Handles/Surfaces | Between every client | Wipe with 70% alcohol or disinfectant |
To maintain efficiency, keep extra sets of frequently used tools on hand. This allows for a smooth rotation through sterilization cycles. Use a designated "dirty tool bin" to collect used implements throughout the day, processing them all at once at the end of the workday. Always ensure tools are completely air-dried before sterilization.
Additionally, routine inspections and replacements are essential for maintaining high standards.
Inspecting and Replacing Tools
Before sterilizing, inspect each tool for cracks, chips, rust, or residue. Debris left on tools during sterilization can become permanently baked onto the surface, compromising both hygiene and functionality. Any tool showing signs of damage or contamination should be removed from service immediately for reprocessing or professional repair.
Pay special attention to tools with moving parts. Hinges, joints, and lumens (narrow internal channels) require extra care, including regular manual flushing and occasional disassembly. Apply a water-soluble lubricant sparingly to moving parts to keep them functioning smoothly.
To maintain compliance, document every sterilization cycle, including the date, method, cycle parameters, and operator. Label tool packages with sterilization dates and batch numbers, and retain these records for at least three years. These records should always be accessible for inspection.
Finally, store sterilized tools using a first-in, first-out (FIFO) system. This ensures older tools are used before newer ones, preventing items from sitting unused for extended periods.
Conclusion
Taking your cleaning routines to the next level means committing to consistent excellence in tool maintenance and sterilization.
Properly cleaning and sterilizing aesthetic tools isn’t just about meeting regulations - it’s about protecting your clients’ health and earning their trust. As McKay Jolley from My Absolute Beauty says, "When your beauty tools are properly maintained and sanitized, it dramatically stifles bacteria and viruses that can lead to infections and illness - pertinent for both you and your client."
Each stage in the reprocessing process - cleaning, disinfecting, and sterilizing - works together. Skipping even one step weakens the entire protocol. While sanitizing eliminates most germs, sterilization is the only method that completely destroys all microbial life, ensuring the highest standard of safety.
Your workspace and how you handle tools shape a client’s perception of your professionalism before the treatment even begins. For example, opening sterile bags in front of clients is a small but powerful way to demonstrate your commitment to their safety. It’s these thoughtful details that build trust and set you apart from the competition.
Beyond client safety, rigorous tool maintenance protects your investment. Regular cleaning prevents issues like rust and ensures tools remain in top condition for years. It also keeps you compliant with legal requirements and professional insurance standards, giving you peace of mind while running your business.
Consistency is everything. By establishing daily and weekly routines, documenting sterilization cycles, and inspecting tools regularly, you’ll create habits that become second nature. Clear records and thorough inspections not only ensure compliance but also show your clients the level of care and professionalism they deserve.
These practices aren’t just about hygiene - they’re about creating a safe, trustworthy, and thriving environment for every client interaction.
FAQs
How do I know if a tool needs disinfection or sterilization?
When deciding whether a tool requires disinfection or sterilization, it all comes down to how it interacts with the client.
- Sterilization is a must for tools that come into contact with mucous membranes or sterile tissue. This process eliminates all microorganisms, ensuring maximum safety.
- For non-critical tools that only touch intact skin, low-level disinfection is usually sufficient.
Always evaluate how each tool is used and adhere to health regulations to maintain proper hygiene and safety standards in aesthetic procedures.
Can I disinfect tools if I don’t have an autoclave?
Yes, it's possible to disinfect tools without using an autoclave. Start by thoroughly cleaning the tools with soap and water to remove any debris. Then, apply approved chemical disinfectants, such as a diluted bleach solution or commercial products designed for cosmetic tools. While this process effectively reduces microorganisms, it doesn't achieve the same level of sterilization as an autoclave. This method works well for tools that don't need complete sterilization.
How often should I do spore tests on my autoclave?
The frequency of spore testing varies based on how often the autoclave is used and local regulations. In healthcare environments, monthly testing is common. For autoclaves used only a few times a year (e.g., 2–3 times annually), testing before each use is recommended. Always consult your autoclave manufacturer's instructions and adhere to local guidelines to ensure sterility standards are met.
Leave a comment