

Climate-Controlled Warehousing for Beauty Supplies
I start with the product label - not a standard room temperature. For beauty supplies in Canada, I use manufacturer limits to plan storage, then test the room before loading stock. 15–25°C and below 60% relative humidity are planning references, not rules for every product.
My checklist covers three steps:
- Plan the zones: Record product limits, lots and expiry dates; separate refrigerated, moisture-sensitive, hazardous and quarantined stock as needed.
- Test the space: Check insulation, heating, cooling and airflow. Map temperature and humidity for at least seven consecutive days, then place calibrated sensors at the problem spots.
- Protect stock each day: Set alarms and response duties, limit time outside storage during handling, check equipment before winter and summer, and prepare for outages.
<u>I approve loading only after the readiness checks pass.</u> If storage limits are exceeded, I hold affected stock until a documented quality review confirms what happens next.
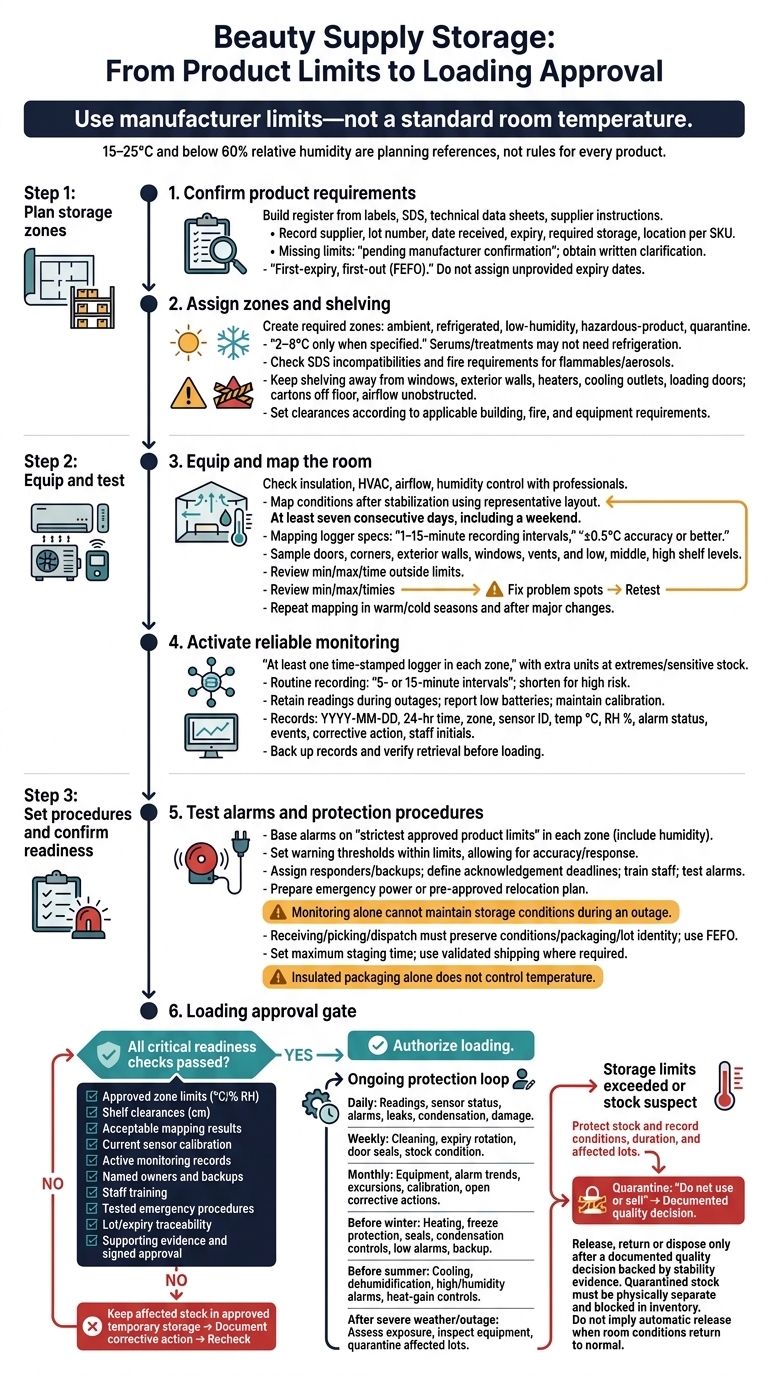
Beauty Supply Storage: From Product Limits to Loading Approval
Step 1: Check Product Requirements and Plan Storage Zones
Record Storage Instructions, Lot Numbers, and Expiry Dates
Build a storage register using labels, safety data sheets (SDS), technical data sheets and supplier instructions. Use manufacturer limits. The ranges of 15–25°C and under 60% relative humidity (RH) are planning references only. Mark any missing limits “pending manufacturer confirmation” and ask for clarification in writing.
For each SKU, record the supplier, lot number, date received, expiry date if provided, required storage conditions and storage location. Follow first-expiry, first-out (FEFO): put stock with the earliest expiry at the front and review inventory on a set schedule. Don’t assign expiry dates when the supplier hasn’t provided them.
| Product category | Temperature and humidity limits | Light protection | Separation needs | If limits are exceeded |
|---|---|---|---|---|
| Ambient cosmetics | Confirm product limits with the manufacturer | Follow label instructions | Follow product instructions and SDS | Hold affected lots and record conditions and duration for assessment |
| Products requiring refrigeration | Confirm specified limits; use 2–8°C only when specified | Follow product documentation | Use a dedicated refrigerator or validated cold room | Quarantine pending technical assessment |
| Moisture-sensitive supplies | Confirm limits with the manufacturer | Follow packaging instructions | Keep protective packaging intact in dry storage | Quarantine stock with damp or damaged packaging |
| Flammables and aerosols | Follow label and SDS limits | Follow sunlight warnings | Separate incompatible products according to applicable fire requirements | Follow SDS procedures to isolate affected stock safely |
Assign each SKU to a storage zone using this register before sizing the room.
Separate Stock by Storage Requirements
Set up only the zones your register calls for: ambient, refrigerated, low-humidity, hazardous-product and quarantine. In a clinic, labelled shelf sections or cabinets may be enough. A warehouse may need dedicated rooms or controlled pallet locations. Serums and treatment supplies don’t automatically need refrigeration.
Before assigning space or choosing cabinets for flammables and aerosols, check SDS incompatibilities and provincial and local fire requirements.
Label quarantined stock “Do not use or sell”, keep it physically separate and block it in inventory. Record the reason for quarantine, date, lot and final action.
Keep Shelves Away from Heat and Doorways
Plan shelving away from windows, exterior walls, heaters, cooling outlets and loading doors. Confirm these locations during Step 2 mapping. Keep cartons off the floor and leave room for air to flow around stock.
Set clearances according to applicable building, fire and equipment requirements - not a single distance for every space. Keep vents, aisles and exits clear.
Use the planned shelf locations as the starting point for the room map, sensor placement and airflow checks in Step 2.
sbb-itb-8ec3e54
Step 2: Equip and Test the Storage Room
Use the zone plan from Step 1 to position HVAC equipment, sensors, and controls before stock enters the room.
Insulate the Room and Size Heating and Cooling
Design the room to meet the storage limits of your most sensitive beauty products and treatment supplies. Then test whether it can stay within those limits.
Inspect exterior walls, ceilings, floors, windows, loading doors, service penetrations, and door assemblies. Seal cracks and penetrations, replace damaged weatherstripping, and add self-closing doors or strip curtains where appropriate.
Ask a qualified building-envelope specialist to check that the insulation and vapour-control layers suit the building assembly, moisture risk, and local Canadian climate. The wrong assembly can trap condensation inside walls. Where needed, control solar gain with exterior shading, reflective glazing, or blinds.
Have a qualified HVAC professional calculate heating, cooling, and humidity-control loads. The calculation should account for insulation, local winter and summer conditions, solar gain, lighting, staff, equipment, inventory, door use, receiving activity, and air leakage. Include dehumidification where moisture loads call for it.
Pair battery-backed monitoring with emergency power or a pre-approved relocation plan. Monitoring alone cannot maintain storage conditions during an outage.
Once the room holds its set conditions, map its hot and cold spots.
Map Temperature and Humidity Across the Room
After conditions stabilize, place calibrated loggers near doors, corners, exterior walls, windows, and vents, as well as at low, middle, and high shelf levels.
Map conditions for at least seven consecutive days, including a weekend, during normal operation. Use recording intervals of 1–15 minutes and loggers with an accuracy of ±0.5°C or better. Test with representative shelving, loading, lighting, and door use - not just an empty room.
At each point, review the minimum, maximum, and time spent outside storage limits. Fix hot, cold, or damp spots, then retest before releasing the room for use. Repeat mapping in warm and cold seasons and after major layout or equipment changes.
Use the worst-performing points to guide permanent sensor placement.
Install Sensors and Record Storage Conditions
Install at least one time-stamped logger in each zone, with extra units at mapped extremes and near sensitive stock. Keep fixed sensors away from direct airflow and sunlight, but within areas that represent product storage conditions.
Choose devices that retain readings during network outages and report low batteries. Use 5- or 15-minute recording intervals, shortening them where fast changes or product risk call for closer monitoring. Set written calibration or verification schedules based on device instructions and applicable obligations.
Each record should include:
- Date and time, local time zone, zone, and sensor ID
- Temperature in °C, relative humidity in %, and alarm status
- Door or equipment events, corrective action, and staff initials
Use YYYY-MM-DD and 24-hour time consistently. Keep raw readings, calibration certificates, mapping reports, and approved changes for the period required by your quality system and product obligations. Protect records against editing without permission, back them up, and confirm that you can retrieve them before loading stock.
Step 3: Set Alarms and Stock-Handling Procedures
Set Alarm Limits and Handle Storage Excursions
Once room conditions are stable, use the readings to set alarm limits and response rules.
Base each zone’s alarms on the strictest approved product limits in your storage register, including humidity where relevant. Set warning thresholds within those limits, allowing for sensor accuracy and the time staff need to respond.
Name a primary responder, backup, supervisor, and after-hours contact. Set clear acknowledgement deadlines and escalation steps. Train staff and test alarms before stock arrives.
| Trigger | Immediate action | Contact and escalation | Required record |
|---|---|---|---|
| Temperature warning or excursion | Check doors and equipment; verify readings independently without delaying stock protection; quarantine suspect stock | Storage lead, then backup and quality lead | Zone, sensor, readings, exposure times, affected products, quantities, lots and expiry dates |
| Humidity excursion | Protect moisture-sensitive stock; check condensation and dehumidification; quarantine suspect stock | Storage lead and quality lead | Humidity extremes, duration, affected lots, action |
| Prolonged door opening | Close and secure the door; investigate loading practices or seals | Shift supervisor | Open duration, cause, correction |
| Power, heating, or refrigeration failure | Keep doors closed; activate approved backup arrangements; quarantine suspect stock | Facilities lead and after-hours contact | Outage times, conditions, affected lots, transfer decision |
| Sensor, network, or low-battery alert | Verify conditions with an independent calibrated device; restore monitoring | Monitoring owner, then backup | Sensor ID, verification reading, monitoring gap |
Move affected products only to approved storage. Keep packaging and lot identity intact. Release, return, or dispose of suspect stock only after a documented quality decision backed by stability evidence. If alarms recur, investigate the cause rather than widening limits to silence them.
Protect Stock During Receiving, Picking, and Dispatch
Apply the same temperature and humidity rules at the dock, during picking, and at dispatch.
At receiving, check for leaks, broken seals, crushing, frost, condensation, and heat damage. Review shipment monitoring records when provided. Record the arrival time, transport concerns, and put-away approval. Photograph damage and quarantine questionable deliveries until they’ve been reviewed.
Move accepted stock directly to its assigned zone. Keep original packaging, closures, labels, and sterile barriers intact.
Pick by first-expiry, first-out (FEFO) and confirm that each lot is still approved for use. Before removing stock, verify the item, lot, expiry, quantity, and destination. Where suitable, use clean, dry, closed totes to prevent crushing and protect sterile barriers.
Set a maximum staging time based on product instructions or a documented risk assessment. Insulated packaging alone does not control temperature. Where required, use a validated shipping method. Record the picker, dispatch time, carrier, and monitoring device. Hold delayed or exposed shipments until quality review is complete.
Plan Seasonal Checks and Routine Maintenance
Check controls routinely and before seasonal weather changes to keep them working reliably. During extreme weather or outages, limit door openings and suspend unnecessary loading-bay staging. Review logged temperatures, humidity, and alarms more often, and document exposure. Give each task an owner and backup.
| Timing | Tasks | Owner | Record |
|---|---|---|---|
| Daily | Check readings, sensor status, unresolved alarms, and visible leaks, condensation, or damage | Storage lead | Signed checklist |
| Weekly | Clean storage areas; review expiry rotation, door seals, and stock condition | Shift supervisor | Cleaning and stock-review record |
| Monthly | Review equipment, alarm trends, excursions, calibration status, and open corrective actions | Facilities and quality leads | Review and action log |
| Before winter | Test heating, freeze protection, seals, condensation controls, low alarms, and backup arrangements | Facilities lead | Maintenance and test results |
| Before summer | Service cooling and dehumidification; test high and humidity alarms and heat-gain controls | Facilities lead and monitoring owner | Service and alarm-test records |
| After severe weather or outage | Assess exposure, inspect equipment, and quarantine affected lots where needed | Storage and quality leads | Incident and disposition report |
Conclusion: Confirm Readiness Before Loading Stock
Approve loading only after the room passes the readiness check. Having equipment in place doesn’t mean the room is ready.
Use a signed pre-loading readiness checklist to verify zone limits (°C/% RH), shelf clearances (cm), mapping results, current sensor calibration, and active monitoring records. Keep all supporting evidence together. Confirm named owners and backups, staff training, tested emergency procedures, and traceability from lot and expiry through to final disposition.
Schedule seasonal reviews with an assigned owner, a due date in YYYY-MM-DD format, and evidence of completion. Record approvals and review dates in YYYY-MM-DD format, with times in 24-hour format. If any critical check remains incomplete, keep affected stock in approved temporary storage until corrective action is documented and loading is authorized.
FAQs
Can I store products with different limits together?
Products with different storage climate requirements generally shouldn’t share the same space. Neurotoxins and dermal fillers require strict cold chain compliance, including medical-grade refrigerators and regular temperature monitoring [1].
Storing them alongside products with different temperature limits can put efficacy and safety at risk. Use dedicated storage zones or separate refrigeration units for products with specific temperature or other storage-condition limits. This helps protect your inventory and meet compliance requirements [1].
How do I assess stock after a temperature excursion?
Isolate affected stock immediately to prevent accidental use. Check for separation, discolouration or unusual odours.
Review temperature logs, ideally from a digital data logger, to assess how long the temperature excursion lasted and how far it strayed from the required range. Compare the results with the manufacturer’s storage requirements for each product.
If you’re unsure about product integrity, especially for sensitive injectables or active skincare, check the product documentation or contact the manufacturer to confirm whether the stock is still safe for professional use.
When should I upgrade from cabinets to a controlled room?
Upgrade when products need cold chain compliance or consistent temperature checks beyond basic cabinet protection. This includes injectables that require medical refrigerators with regular temperature monitoring, as well as high-value items that power outages or equipment malfunctions could damage.
Use temperature and humidity data logging with external probes and alarm settings to track conditions and respond promptly when readings drift.
Leave a comment