

Checklist for Using LED Light Therapy in Clinics
LED light therapy is a safe, non-invasive treatment used in Canadian clinics to improve skin health, reduce inflammation, and promote healing. To ensure effective and compliant use, clinics must follow strict guidelines covering device standards, client safety, and treatment protocols. Here’s a quick overview of the key steps:
- Device Compliance: Ensure LED devices are Health Canada-approved, meet safety standards, and have proper documentation (e.g., Medical Device Licence, ISO 13485 certificate).
- Treatment Room Setup: Maintain proper ventilation, keep temperatures below 30°C, and provide protective eyewear and vinyl gloves for clients and staff.
- Client Screening: Use intake forms to identify contraindications like photosensitivity disorders, active skin conditions, or use of photosensitizing medications.
- Pre-Treatment Prep: Cleanse the skin, avoid oil-based products, and choose the appropriate wavelength for the client’s needs.
- Post-Treatment Care: Hydrate the skin, apply sunscreen, and schedule follow-ups for best results.
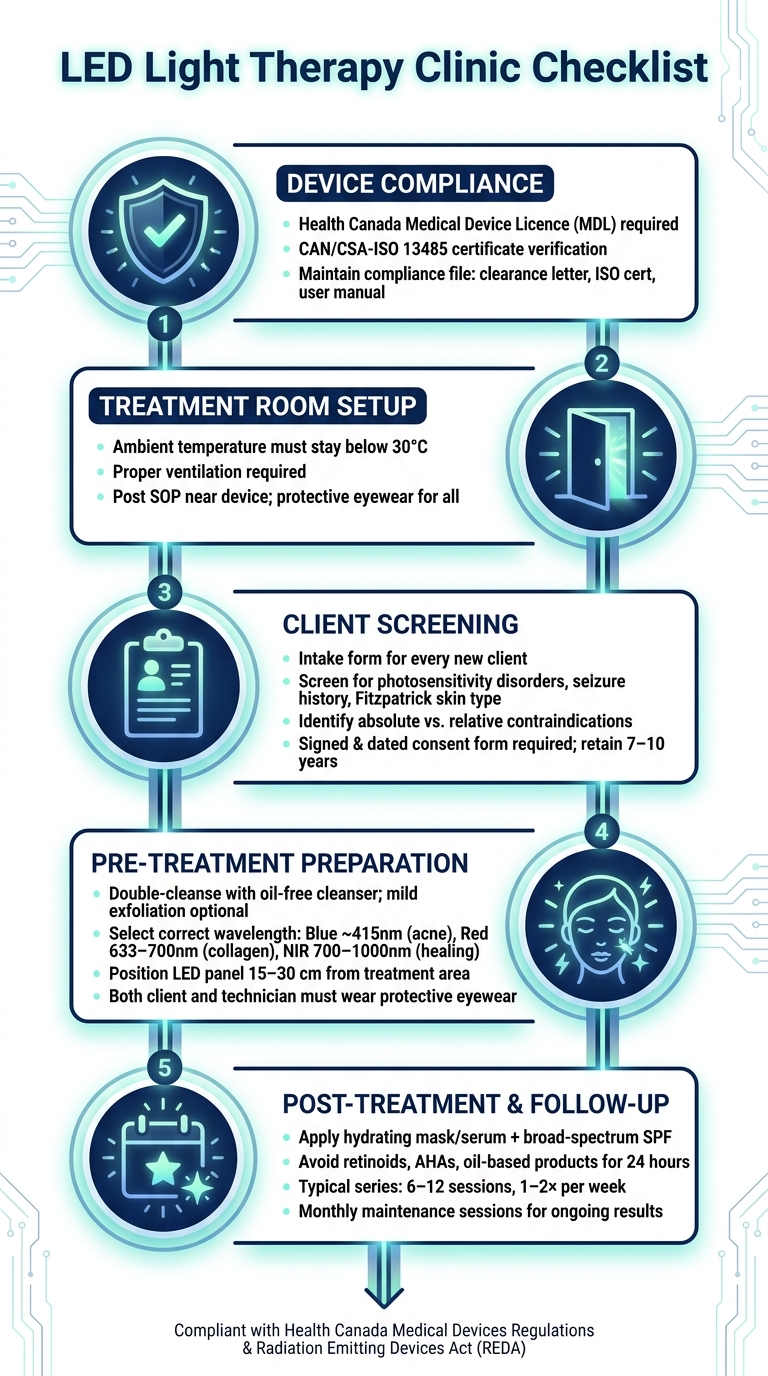
LED Light Therapy Clinic Checklist: 5 Key Steps for Safe & Compliant Treatments
Ep45 - Everything You Need To Know About LED Light Therapy
sbb-itb-8ec3e54
Clinic and Device Compliance Checklist
Before starting a session, it's crucial to ensure your clinic and equipment meet specific standards. This isn't just about maintaining high-quality service - it's about legal requirements and prioritizing client safety.
Regulatory and Documentation Checks
In Canada, LED light therapy devices are regulated under the Food and Drugs Act (via the Medical Devices Regulations) and the Radiation Emitting Devices Act (REDA). Clinics must confirm that any device they purchase or use holds a valid Health Canada Medical Device Licence (MDL). This responsibility falls squarely on the clinic owner.
Additionally, verify that the manufacturer has a CAN/CSA-ISO 13485 Quality Management System certificate, which ensures consistent safety and production standards. Device labelling must include the manufacturer's address and bilingual information, as required by Canadian regulations.
To stay organized, maintain a compliance file for each device. This file should include:
- The Health Canada clearance letter
- The ISO 13485 certificate
- The user manual
Once the paperwork is in order, move on to verifying the physical device and its maintenance.
Device Specifications and Maintenance
Device safety is critical. One key standard is ensuring that skin temperature during use does not exceed 45°C, as outlined by Health Canada.
"A maximum skin temperature above 45°C without an objective and scientifically sound rationale: will be deemed unsafe." – Health Canada
Manufacturers should provide thermal testing data to confirm the device stays within this temperature limit, even under worst-case conditions (e.g., maximum power output without applicator movement). For Class II devices, this data must be available upon request, while Class III and IV devices must include it in their licence application.
Routine maintenance is equally important. The table below outlines recommended actions and their frequency:
| Maintenance Category | Action | Frequency |
|---|---|---|
| Hygiene | Disinfect contact surfaces and protective eyewear | Between every client |
| Physical Integrity | Inspect filters, acrylic barriers, and cables for damage | Before daily use |
| Calibration | Verify timer accuracy and power output settings | Per manufacturer schedule |
| Environment | Check room ventilation and ensure ambient temperature stays below 30°C | Ongoing |
| Compliance | Audit maintenance logs and staff training records | Periodically |
When replacing parts like lamps or filters, always use components that match the original specifications. Non-compliant or more powerful parts can cause overexposure or thermal injuries. Once the device is verified, ensure the treatment room supports safe operation.
Treatment Room Setup
A well-prepared treatment room not only minimizes risks but also ensures smooth sessions. Make sure power outlets are safe and strategically placed to avoid hazards. The room should have proper ventilation to keep the temperature below 30°C - this ensures client comfort and prevents device overheating.
Post a clear, one-page Standard Operating Procedure (SOP) near the device. This should include:
- Setup instructions
- Treatment distances
- Cleaning procedures
- Contraindication warnings
- Emergency contact information
Finally, always have protective eyewear available and in good condition for both the client and the operator during every session.
Client Screening and Safety Checklist
With your clinic, device, and treatment room set up, the next step is determining if a client is a good candidate for LED light therapy. Following Health Canada protocols is crucial - not just for safety but also to protect your practice legally. A thorough screening process ensures both effective treatments and client safety.
Medical History and Skin Assessment
Begin with a comprehensive intake form and LED magnifier for every new client. This helps identify conditions that may not be compatible with light therapy, such as photosensitivity disorders like Porphyria, Lupus, or solar urticaria. Pay close attention to seizure history since pulsed light in the 5–30 Hz range can trigger seizures in photosensitive individuals.
Document the client's Fitzpatrick skin type and note any tattoos. Darker skin tones (Types IV–VI) and dark inks absorb more light, potentially causing heat discomfort or hyperpigmentation. Additionally, check for recent cosmetic procedures - Botox requires a 2-week waiting period, while treatments like chemical peels, microneedling, or laser resurfacing mean therapy should be postponed.
It’s important to use a standardized intake form with clear version control, like "RLT Screen v2.1", to ensure consistency and maintain audit-ready records.
After reviewing medical history and skin type, move on to assess contraindications and adjust treatment protocols as needed.
Contraindications and Precautions
Clients fall into two categories: those who must be excluded entirely and those who require modified protocols.
Absolute contraindications mean the client cannot proceed with treatment:
- Active cancerous lesions in the treatment area
- Diagnosed Porphyria or severe photoallergies
- Photosensitive epilepsy when using pulsed light
Relative contraindications require extra care and adjustments, such as avoiding certain areas or using lower intensity settings. These include:
- Pregnancy (avoid the abdomen and breasts)
- Recent eye surgeries like LASIK
- Thyroid conditions (do not place the panel directly over the thyroid gland)
- Active skin issues like cold sores, open wounds, or infections in the treatment area
The table below highlights common photosensitizing medications that require screening:
| Medication Class | Common Examples | Clinical Consideration |
|---|---|---|
| Antibiotics | Tetracyclines (Doxycycline), Fluoroquinolones | Delay treatment until the medication course is completed |
| Retinoids | Isotretinoin (Accutane), Tretinoin (Retin-A) | Systemic use is a strong relative contraindication |
| NSAIDs | Ibuprofen, Naproxen | High doses may cause photosensitivity; consider a patch test |
| Diuretics | Hydrochlorothiazide, Furosemide | Use lower intensity and shorter duration settings |
| Herbal Supplements | St. John’s Wort | Known photosensitizer; check all supplements |
For clients using topical retinoids, recommend pausing their application several days before treatment. If there’s any doubt about sensitivity, perform a patch test on the inner arm or thigh and wait 24 hours before proceeding.
"PBM carries a much lower risk profile; however, it still requires careful screening for contraindications." – Youlumi
Once you've addressed contraindications and set safe treatment parameters, move on to obtaining informed consent.
Informed Consent
Before starting any session, secure a signed and dated consent form. This document should outline:
- The procedure, expected results, and possible side effects (e.g., mild redness or temporary irritation)
- Confirmation that the client has truthfully completed the intake form
- Key sections covering Medical History, Medications and Supplements, Skin Status, Eye Health, Seizure History, and the client’s signature
For clients under 14, a guardian must provide written consent, and the child must be able to remain still and wear protective eyewear throughout the session. Keep all signed consent forms for at least 7 to 10 years, in compliance with Canadian recordkeeping regulations.
Pre-Treatment Preparation Checklist
After completing the consent and contraindication review, these steps are key to ensuring safe and effective treatment. Missing even one can impact the results.
Client and Skin Preparation
Start by double-cleansing the skin with an oil-free cleanser to eliminate any residue and allow the light to penetrate properly. A mild exfoliation, such as a sugar scrub or microdermabrasion, can help remove dead skin cells that might block light absorption.
If you're applying a serum, stick to water-based formulas and avoid oil-based products. Both the client and technician must wear approved protective eyewear before turning on the device.
Device Setup and Protocol Selection
Choose the wavelength that aligns with the client's specific skin concerns. The table below provides guidance for selecting the appropriate wavelength:
| Wavelength | Range | Primary Goal | Typical Duration |
|---|---|---|---|
| Blue | ~415 nm | Targets acne-causing bacteria | 10–15 minutes |
| Amber/Yellow | 570–590 nm | Calms redness and sensitivity | 10–20 minutes |
| Red | 633–700 nm | Stimulates collagen, reduces fine lines | 15–20 minutes |
| Near-Infrared | 700–1,000 nm | Deep tissue healing, reduces inflammation | 10–15 minutes |
"Effective LED treatment is not just about using light. It is about using the right light for the right reason." - Luminous Skin Lab Education Team
Make sure the timer and fault alert settings are correctly configured according to the manufacturer’s instructions. Position the LED panel 15–30 cm (6–12 inches) from the treatment area to ensure even exposure. Use a ruler or the device's built-in guides if necessary. Once the device is ready, confirm the client is comfortable and safe to begin.
Comfort and Safety Checks
Before starting the treatment, ensure the client is reclining comfortably and the light source is securely positioned above them. Explain that LED therapy is a low-intensity, relaxing procedure and establish a clear verbal signal for the client to use if they need assistance during the session.
For clients with darker skin tones (Fitzpatrick Types IV–VI) or visible dark tattoos in the treatment area, double-check that the intensity settings are adjusted to avoid overheating. If the client has a history of photosensitive epilepsy, ensure the device is set to continuous wave mode rather than pulsed mode before proceeding.
Post-Treatment and Follow-Up Checklist
Taking the right steps after treatment ensures the best possible results.
Immediate Post-Treatment Care
Right after the session, it's important to soothe and protect the skin. Use a hydrating mask, water-based serum, or moisturiser to help restore the skin barrier. If the client is heading out during the day, always finish with a broad-spectrum SPF - this is non-negotiable. Be sure to take before-and-after photos to track progress over time.
If the LED session followed a more intensive treatment like microneedling or a chemical peel, keep an eye out for any unusual responses. LED therapy is excellent for calming redness and reducing inflammation caused by these active procedures.
Wrap up by giving clients straightforward home care instructions to maintain the benefits of the treatment.
Home Care Instructions
For the first 24 hours post-treatment, recommend that clients avoid oil-based products, active exfoliants (like retinoids or AHAs), and unprotected sun exposure. Keeping the skin hydrated should be their top priority - a gentle, fragrance-free moisturiser works best.
"Professional LED results are usually strongest when clients understand that consistency matters. Rather than positioning LED as a one-time miracle step, the esthetician can explain the value of repeat sessions and home maintenance." - Luminous Skin Lab Education Team
While many clients may notice a post-treatment glow right away, it's important to set realistic expectations. For issues like acne or fine lines, significant improvements require a series of sessions rather than a single visit.
Planning Follow-Up Sessions
Once immediate care and home instructions are covered, it’s time to plan follow-ups to build on the results. LED therapy works best with consistency, so scheduling regular sessions is key. A typical series involves 6–12 treatments, done 1–2 times per week, followed by monthly maintenance to keep up the results. Here’s a quick guide to scheduling based on treatment goals:
| Treatment Goal | Recommended Frequency | Series Length |
|---|---|---|
| Acne | 2–3× per week | 8–12 sessions |
| Anti-Aging | 2–3× per week | 6–12 sessions |
| Melasma | 1–2× per week | Varies by progress |
| Wound Healing / Recovery | Daily or every other day | Until healed |
| Maintenance | 1× per month | Ongoing |
Before booking the next appointment, check if the client has started any new photosensitising medications or had recent Botox injections. If so, delay treatment for at least two weeks. LED therapy also pairs well with other treatments like dermaplaning, hydrodermabrasion, and paraffin treatments, so consider how it can complement a broader skincare plan tailored to each client.
Conclusion
LED light therapy delivers results when used consistently and correctly. Following a structured checklist - from ensuring device standards to proper post-treatment care - helps achieve dependable outcomes in clinical settings.
"When a protocol is repeatable, the treatment becomes more professional, more teachable, and more scalable within a spa or skincare practice." - Luminous Skin Lab Education Team
Health Canada recognizes LED therapy as safe when applied according to established guidelines. By adhering to these protocols, clinics not only protect themselves from liability but also maintain compliance with regulatory standards. A well-documented protocol keeps your practice audit-ready and ensures smooth operations.
Consistency is key to building trust with clients and fostering loyalty over time.
Think of your protocol checklist as a dynamic tool. Regularly update it with staff input and adapt to new device recommendations. Clinics that strictly follow these steps meet Health Canada's requirements while delivering reliable and effective treatments. For professional-grade LED devices and educational support, visit Beauty Pro Supplies Canada (beautyprosupplies.com) to ensure your practice maintains high standards from day one.
FAQs
How do I confirm an LED device is Health Canada approved?
To verify if an LED device is approved by Health Canada, you’ll need to check the Medical Devices Active Licence Listing (MDALL) database. Here’s how:
- Search using details such as the company name, licence number, device name, or any identifier found on the product label.
- Remember, devices classified as Class II, III, or IV are required to have a valid licence to be legally sold or imported within Canada.
For clinics aiming to meet safety and compliance requirements, companies like Beauty Pro Supplies Canada provide support to ensure everything aligns with regulations.
What should my SOP include for LED light therapy?
An effective SOP for LED light therapy should address five core areas: patient screening, session parameters, safety measures, maintenance, and detailed documentation.
- Patient Screening: Begin by reviewing the patient’s medical history, specifically looking for conditions like photosensitivity, pregnancy, epilepsy, or any medications that could cause adverse reactions. Always ensure informed consent is obtained before starting treatment.
- Session Parameters: Clearly define the therapy parameters, including the specific wavelengths to be used, the duration of each session, and the appropriate distance between the device and the patient.
- Safety Measures: Prioritize safety by ensuring proper use of eye protection for both the patient and the practitioner. Follow proper handling procedures for all equipment to prevent accidents or device malfunctions.
- Maintenance: Regular cleaning, calibration, and inspections of the LED device are crucial. Adhering to these practices ensures optimal performance and extends the lifespan of the equipment.
- Documentation: Record all treatment details meticulously, including session settings, patient responses, and any observations. This not only tracks progress but also ensures compliance with professional standards.
Always follow the manufacturer’s guidelines for the device and refer to resources, such as those provided by Beauty Pro Supplies Canada, to maintain high professional standards.
How do I handle clients on photosensitizing meds?
Clients taking photosensitizing medications are more prone to burns, hyperpigmentation, or blistering during treatments. To minimize risks, start by screening for both systemic and topical medications during the intake process. Discuss potential risks openly and document everything thoroughly. If there's any doubt, it's wise to get clearance from the client’s physician.
Always perform a patch test on a small area, like the inner thigh, and monitor the reaction for 24 hours before proceeding. For added safety, use lower energy settings or opt for shorter sessions. Make sure your LED device has a narrow emission spectrum, as this helps reduce the chance of phototoxic reactions.
Leave a comment