

Microneedling Depth Guide for Fine Lines
If I’m treating fine lines with microneedling, I usually stay within 0.25 mm to 1.0 mm and start low. For most early lines, 0.25–0.5 mm is the safer starting zone. For mild static lines, 0.5–1.0 mm is often used by trained professionals, with more redness and more downtime.
Here’s the short version:
- 0.25 mm: surface-level treatment, product penetration, upkeep
- 0.5 mm: early fine lines, mild texture, thinner or reactive skin
- 0.5–1.0 mm: mild static lines and stronger collagen response
- Periorbital and perioral skin: keep depth lower because skin is thinner
- Cheeks and jawline: depth can sit a bit higher because tissue is thicker
- Increase by only 0.1–0.2 mm after the skin heals well
- In Canada, I’d check provincial scope, local public health rules, and insurance rules first while wearing powder-free nitrile gloves
Downtime often tracks with depth. At around 0.5 mm, redness may settle within 24 hours. Closer to 1.0 mm, redness and mild swelling may last 24–72 hours.
| Area | Usual starting range for fine lines |
|---|---|
| Forehead | 0.25–0.75 mm |
| Periorbital | 0.25–0.5 mm |
| Cheeks | 0.5–1.0 mm |
| Perioral | 0.25–0.5 mm |
| Jawline / lower cheek | 0.5–1.0 mm |
My main rule: match depth to the facial area, skin thickness, and healing history - not just the line itself. Then chart the exact depth and cartridge lot for each zone before the next visit.
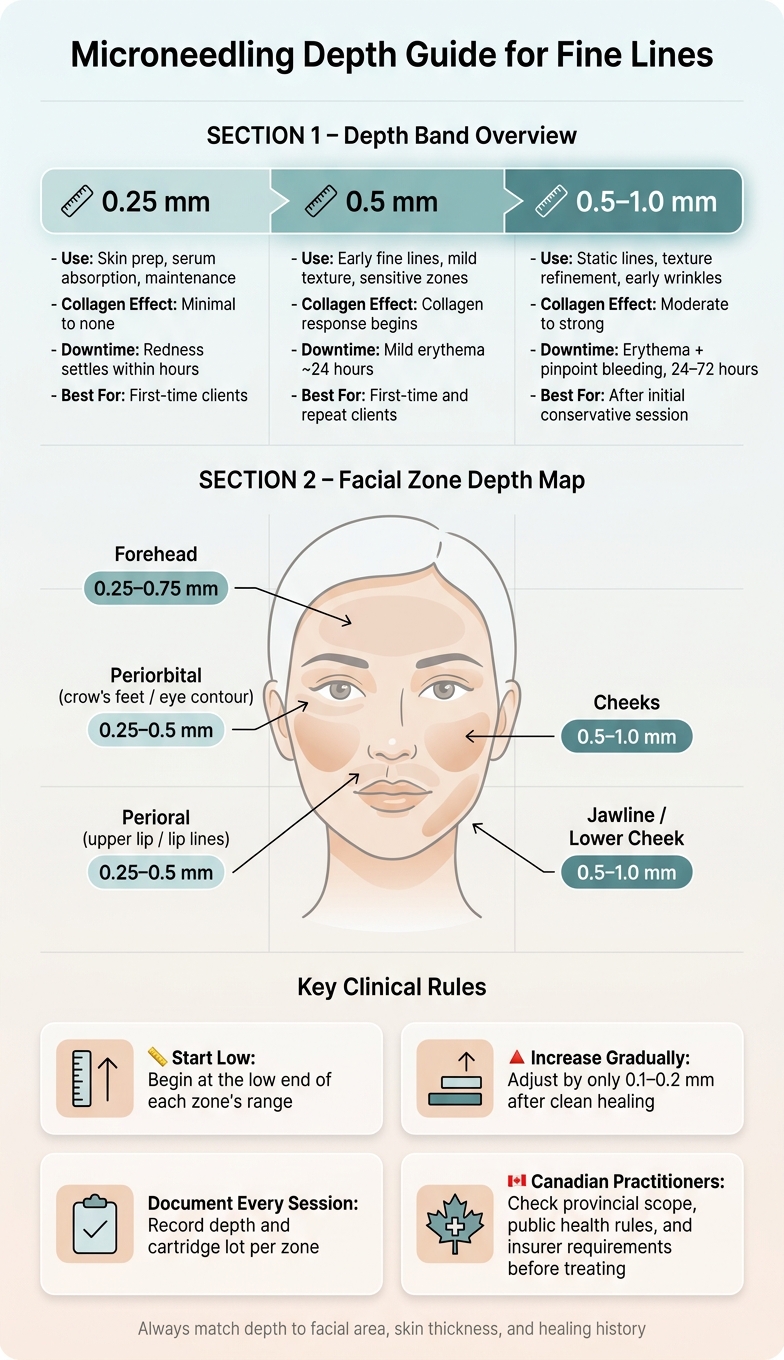
Microneedling Depth Guide for Fine Lines by Facial Zone
Microneedling Depths by Area: What Most People Get Wrong
sbb-itb-8ec3e54
Common microneedling depth ranges for fine lines
For fine lines, the right depth depends on three things: how visible the lines are, how thick the skin is, and how reactive the area feels. Below 0.5 mm, the focus is mostly on surface-level support. From 0.5–1.0 mm, the goal shifts more toward collagen response.
In practice, microneedling professionals usually stay on the shallow side for fine lines because these lines sit close to the surface. From there, facial area and skin thickness help narrow the setting.
0.25–0.5 mm for early fine lines and sensitive skin
At 0.25 mm, treatment stays very superficial. The main benefit here is better product penetration and routine upkeep. Collagen induction is minimal at this depth, but the micro-channels can help serums absorb more easily and may leave the skin with a temporary surface glow.
That makes 0.25 mm a solid pick for:
- very early fine lines
- prep sessions before topical application
- maintenance between deeper treatments
At 0.5 mm, the needles reach the papillary dermis, which is where collagen response starts. This depth tends to work well for early fine lines, mild texture changes, and small pores. Downtime is usually light. Most clients get mild pinkness that settles within about 24 hours.
Because of that, 0.5 mm is often a good entry point for first-time clients. It also suits thinner or reactive skin, plus touchy areas like the under-eye region and upper lip.
0.5–1.0 mm for collagen-focused treatment
This is the main professional range for softening mild static lines, meaning lines you can see even when the face is at rest. At these depths, the needles reach the superficial to mid papillary dermis, where fibroblasts produce collagen and elastin.
For fine lines that go beyond a slightly crepey look, this range can do more. Think early crow's feet, shallow perioral lines, or faint forehead lines. Over a series of sessions, 0.5–1.0 mm gives more noticeable remodelling.
There is a trade-off, though. The deeper you go, the more sensation the client feels. That’s why many practitioners use topical anaesthetic, especially as they get close to 1.0 mm or treat bony parts of the face.
Recovery also becomes more obvious. Post-treatment erythema tends to be stronger, and you can expect 24–72 hours of redness, pinpoint bleeding, and mild swelling, depending on the client's sensitivity and the exact depth. Aftercare matters more too: avoid sun, skip makeup for a short period, and pause active ingredients until the skin barrier settles down.
Shallow vs moderate depths
The table below gives a quick starting point before adjusting for the client’s facial area and skin response.
| Depth Band | Main Use | Collagen Effect | Comfort/downtime | First-Time vs. Experienced |
|---|---|---|---|---|
| 0.25 mm | Skin prep, serum absorption, maintenance | Minimal to none | Very comfortable; redness settles within hours | Ideal for first-time clients |
| 0.5 mm | Early fine lines, mild texture, sensitive zones | Collagen response begins | Mild erythema; resolves within about 24 hours | Suitable for first-time and repeat clients |
| 0.5–1.0 mm | Static lines, texture refinement, early wrinkles | Moderate to strong collagen response | Moderate erythema, pinpoint bleeding; 24–72 hours downtime | Often used after an initial conservative session |
Next, match these depths to facial zones and skin thickness.
How facial area and skin thickness affect depth choice
Use the general 0.25–1.0 mm range as your baseline. From there, narrow the setting based on the facial area and the client’s skin thickness. Think of these as starting points, not hard rules. The area you’re treating often limits depth more than anything else.
Forehead and periorbital fine lines
Forehead fine lines usually fall within 0.25–0.75 mm. For thin or reactive skin, stay in the 0.25–0.5 mm range. Move closer to 0.75 mm only when the forehead is thicker or shows sun damage. Skin sits close to bone here, so depth isn’t the whole story. Pressure and number of passes matter just as much.
The periorbital zone - the crow’s-feet area and eye contour, not the eyelid - has some of the thinnest skin on the face. Depth here usually stays between 0.25–0.5 mm. Keep passes light and ensure you are wearing nitrile gloves for proper hygiene. Avoid the area directly along the lash line and orbital rim entirely. If a client bruises easily or has periorbital hollowing, stay at the lower end.
Cheeks, perioral area, and jawline
Cheeks usually sit in the 0.5–1.0 mm range. A good place to start is 0.5–0.75 mm, then go higher only after you’ve seen that the client heals cleanly.
Perioral area needs more caution. The skin here is thin, very sensitive, and in constant motion. Stay at 0.25–0.5 mm. Depths of 0.5–0.75 mm should be kept for later sessions and used only by experienced practitioners.
Jawline / lower cheek is treated much like the cheeks, at 0.5–1.0 mm.
Area-by-area depth guide: comparison table
The table below gives starting points, not fixed rules. Adjust based on skin response and client history.
| Facial Area | Typical Fine-Line Depth Range (mm) | Skin Sensitivity Notes | Primary Treatment Focus |
|---|---|---|---|
| Forehead | 0.25–0.75 mm | Thin skin near bone; adjust for skin quality | Early fine lines and horizontal creases |
| Periorbital | 0.25–0.5 mm | Very thin, high sensitivity; avoid lash line and orbital rim | Crow's feet, crepey texture at eye contour |
| Cheeks | 0.5–1.0 mm | Thicker dermis; moderate sensitivity | Fine lines, mild texture, pore refinement |
| Perioral | 0.25–0.5 mm | Thin, highly sensitive, highly mobile | Fine lip lines, early perioral creases |
| Jawline / Lower Cheek | 0.5–1.0 mm | Thicker tissue; lower sensitivity | Fine lines, subtle tightening, texture |
Start low, then increase by 0.1–0.2 mm only after clean healing and proven tolerance. These area-based baselines help you set the first pass, while client history and treatment goals shape the final choice.
Step-by-step depth selection for professional treatments
Depth selection works best as a simple step-by-step process: assess before treatment, watch the skin during the session, and document the outcome for the next visit. Use the area-based ranges above as your starting point, then fine-tune based on skin response and treatment history.
Assess skin, history, and treatment goals first
Before you touch the microneedling device, take a close look at the client's skin. Check skin thickness and note any active sensitivity. Classify the skin as sensitive, dry, mature, or sun-damaged, or as normal-to-oily, then line up the depth with what the client can comfortably handle.
Treatment history matters too. During the consult, review past treatments and get clear on the goal. Smoothing fine lines, refining texture, and addressing early slackening don't all call for the same intensity. When you connect skin type, history, and the treatment goal, you get a much more precise starting depth.
Choose a starting depth and adjust in small increments
Start on the cautious side. Use the area-based baseline from the previous section for your first pass, then pay close attention to how the skin responds. Keep the setting within a comfortable range.
If the client heals cleanly and the goal still hasn't been met, increase by 0.1–0.2 mm at a future session. After each session, record the exact depth used in every zone so the next appointment begins with a clear baseline. Also confirm provincial scope, device instructions, and insurer requirements before changing protocols or adding equipment.
Sample client profiles and starting depths: comparison table
These examples show how to set the first pass by skin type and treatment pattern.
| Client Profile | Conservative Starting Point | Follow-up Notes |
|---|---|---|
| Sensitive, dry, mature, or sun-damaged skin | Start at the low end of the range | Reassess before increasing depth |
| Normal-to-oily skin with no unusual sensitivity | Use the area-based baseline | Increase by 0.1–0.2 mm only if healing is clean |
| Multiple treatment areas | Set each area separately | Document each zone for the next visit |
Use these profiles to guide the first session, then adjust the next one based on the documented response.
Canadian practice considerations, equipment, and conclusion
Once you’ve chosen the right depth, safe treatment depends on compliance and clean, sterile handling. In Canada, microneedling is considered an invasive service because it breaks the skin barrier. Before treating fine lines, check provincial and local public health rules. Facility standards, consent, qualifications, and oversight can differ from one area to another.
Use single-use, sterile cartridges or tips for one client only. Open them chairside, then discard them right away in a puncture-resistant sharps container. Never recap or reuse cartridges.
Your setup should also include a device with a documented backflow barrier. Cleanse the skin, apply 70% isopropyl alcohol, perform hand hygiene, and wear medical-grade gloves. Stay away from inflamed or infected skin, and use eye protection when working in the periorbital area.
Good charting matters just as much as clean technique. Record each cartridge’s manufacturer, lot number, expiry date, and invoice details on site. For every client, chart the lot number and the depth used for each facial zone. That way, you’re not guessing at the next visit.
Before you bring in a microneedling treatment starter bundle or add a new service, confirm with your insurer that your professional liability coverage applies. Beauty Pro Supplies Canada supplies professional microneedling equipment, sterile disposables, and training resources. That support connects equipment, disposables, and training to safer fine-line protocols.
Key takeaways for safe and precise fine-line treatment
For a quick clinical reference, keep fine-line microneedling within 0.25–1.0 mm. Start on the lower end based on the treatment zone, then increase by 0.1–0.2 mm only after clean healing. Record each session’s depth and cartridge lot. That record becomes the starting point for the next session.
FAQs
How often should microneedling for fine lines be done?
The material provided does not include microneedling-specific guidance on how often to treat fine lines and early wrinkles.
So, based on this material alone, that question can’t be answered.
When should depth not be increased?
Don’t increase microneedling depth in thinner or more sensitive areas. The same goes for clients whose skin is prone to irritation or whose history points to a higher risk of over-treatment.
In those cases, keep the settings lower. Only move up if the treatment area and personal factors - like tolerance and past response - show that it makes sense.
What aftercare helps reduce redness and irritation?
To help cut down redness and irritation after professional treatments, stick to safe protocols. If irritation lasts more than two hours after a test, stop use right away.
For sensitive skin, lower irradiance levels - around 25 to 120 mW/cm² - can help minimise irritation. Beauty Pro Supplies Canada also offers professional products and educational resources to support safe, compliant skin care practices.
Leave a comment