

Ultimate Facial Lymphatic Drainage Guide
Facial lymphatic drainage is a light, step-based depuffing method - not a sculpting fix, and not a deep massage. If I had to boil this guide down, I’d say this: screen first, use feather-light strokes, move fluid from the face toward the ears and down the neck, and set clear expectations that results often last hours to a few days.
If you offer this service in Canada, the big takeaways are simple:
- Puffiness is usually fluid, most often around the eyes, cheeks, and jaw
- Light pressure works better than deep pressure because surface lymph vessels sit close to the skin
- Order matters: open the neck first, treat the face second, then finish the neck again
- Client screening matters most for infection, clot risk, heart issues, skin inflammation, cancer history, and recent injectables or surgery
- Documentation should be clear and dated in YYYY-MM-DD format, such as 2026-09-11
- Room setup counts: about 21–23 °C, clean tools, clean linens, and enough glide to avoid drag
- Tool choice comes after technique, whether you use hands, gua sha, rollers, or microcurrent
- Aftercare helps maintain the result, with water, lower sodium, and no heat or hard exercise for 24–48 hours
- Progress tracking should be simple: standard photos with written consent and mm-based measurements
A few numbers help set the pace:
- Hold each light skin stretch for about 3 seconds
- Use about 5–10 passes for most zones
- Spend 10–20 passes on under-eye swelling when needed
- Full hands-only sessions often run 30–45 minutes
Here’s the core flow at a glance:
| Step | What I focus on | Main point |
|---|---|---|
| 1 | Intake and consent | Rule out red flags before hands-on work |
| 2 | Neck opening | Start at the supraclavicular area and neck |
| 3 | Facial drainage | Move from the centre outward toward collection points |
| 4 | Finish neck | Clear the exit route again |
| 5 | Aftercare and notes | Give written aftercare and chart the session |
For Canadian beauty professionals, this guide is less about theory and more about safe treatment-room use: who to treat, who to postpone, how light to work, what order to follow, and how to record the session properly.
Facial lymphatic drainage basics: anatomy, puffiness, and pressure
Key facial and neck drainage pathways used in treatment
Now that the pressure rule is set, the next step is knowing where the fluid is meant to go.
Facial lymph moves through shallow channels toward the preauricular, submandibular, cervical, and supraclavicular nodes. The main collection points are the preauricular nodes in front of the ear and the submandibular nodes under the jaw. From there, drainage travels through the cervical chains along the neck and into the supraclavicular area above the collarbone.
In practice, that means you guide fluid from the centre of the face outward to the nearest collecting points, then down the neck using light, directional strokes. It’s a simple path, but it shapes the order of every stroke in treatment.
What causes facial puffiness and why light pressure works better
Facial puffiness usually comes down to fluid retention and slower lymphatic or venous drainage. You see this most often in the loose connective tissue around the eyes and cheeks, where swelling tends to show up fast.
Common triggers include:
- poor sleep
- high sodium intake
- alcohol
- dehydration
- inflammation
- allergies
- sinus congestion
- menstrual-cycle changes
After microneedling, filler, or laser, swelling happens because of inflammation and increased capillary permeability. Even then, the same drainage pathways still apply.
This is why light, skin-stretching pressure works better. Deep pressure can compress shallow lymphatic vessels. Light, rhythmic strokes work with their natural pumping action instead of against it. A good rule of thumb is to hold a gentle skin stretch for about 3 seconds, then fully release before starting the next stroke.
Lymphatic drainage is not like relaxation massage. It’s slower, lighter, and directional. Heavy-handed work can irritate the skin and make drainage less effective. That pressure logic also shapes how you screen clients and prep for treatment.
sbb-itb-8ec3e54
Client assessment and preparation before a depuffing facial
Intake, contraindications, and when to postpone treatment
Facial lymphatic drainage uses very light pressure and works along shallow pathways. That’s why screening needs to happen before any hands-on work.
Start with a full intake. Review the client’s history around cardiovascular health, the lymphatic system, clotting issues, cancer, thyroid conditions, autoimmune conditions, and diabetes. Ask directly about any past DVT or pulmonary embolism.
Do not move ahead with treatment if a client has any of the following:
- Acute illness and infection: active fever, acute skin infection such as erysipelas or cellulitis, active herpes simplex lesions, or open and weeping lesions.
- Clotting and cardiovascular risk: known or suspected deep vein thrombosis, uncontrolled cardiac conditions such as decompensated heart failure, chest pain or pressure, shortness of breath, sudden unilateral facial or neck swelling with pain or warmth, or unexplained rapid weight gain with generalized edema. Decline treatment and advise the client to seek medical assessment.
- Active skin inflammation: severe rosacea flare with heat and pain, or uncontrolled sinus infection.
- Recent procedures: active malignancy without written physician clearance, or any recent cosmetic injectable or surgical work.
When recent injectables or surgery come up, get specific. Ask what was done, when it was done, and who performed it. Do not work directly over fresh injectables or surgical sites until the injector or surgeon provides written clearance.
Your notes should spell this out plainly. For example: No direct gua sha over cheeks; filler placed 10 days ago. Use hands-only, feather-light strokes and indirect drainage routes. Work around the area; do not treat directly over it.
If you postpone or decline a session, document why. Once the client is cleared, you can set up the space and prep the skin.
Room setup, skin prep, and products that support glide
Keep the room at about 21–23 °C. Set up a clean treatment bed with fresh linens and a bolster or headrest that supports the neck in a neutral position. The client should feel settled, not twisted or strained.
Disinfect high-touch surfaces - including the bed, trolley, and tools - with a clinic-grade disinfectant, and follow the manufacturer’s contact time. Clean tools such as cosmetic tools and accessories such as gua sha stones and rollers between clients based on the material they’re made from, then place them on a clean tray.
Wash your hands well before and after every client. Use PPE when clinic policy or the client’s condition calls for it.
For skin prep, cleanse well but gently. Remove makeup, sunscreen, and any surface residue. Then apply a small amount of lightweight, non-comedogenic serum or oil so your hands or tools can glide without dragging. Add a bit more only if needed.
For acne-prone or sensitive skin, a water-based or gel-texture serum usually gives enough slip without feeling heavy. Beauty Pro Supplies Canada carries professional-grade gliding mediums and single-use ampoules suited to clinic use.
Consent and treatment notes for Canadian practice
Before treatment starts, explain the service, what the client is likely to feel, how temporary the results may be, and any short-term effects that can happen. If you plan to use tools like gua sha, rollers, or microcurrent, list them on the consent form. Also note that substitutions may be made based on how the skin responds that day.
Progress photos need explicit written consent. Clinical use and marketing or educational use should be separated. A client might be fine with photos for their file but not for social media, and that distinction needs to be documented clearly.
Your treatment notes for each session should include:
- the date in YYYY-MM-DD format, such as 2026-09-11
- presenting concerns
- any intake updates since the last visit
- contraindication screening results
- areas treated
- pressure and tempo details
- tools used
- products applied
- client response
- aftercare instructions given
Canadian clinical record guidance recommends keeping client records for a minimum of 10 years from the client’s last visit. Good notes make the next session a lot easier. You can match pressure, drainage route, and tool choice instead of guessing.
With consent, notes, and prep finished, move into the drainage sequence.
A Correct Gua Sha Lymphatic Drainage Routine
Facial lymphatic drainage protocol and tool options, step by step
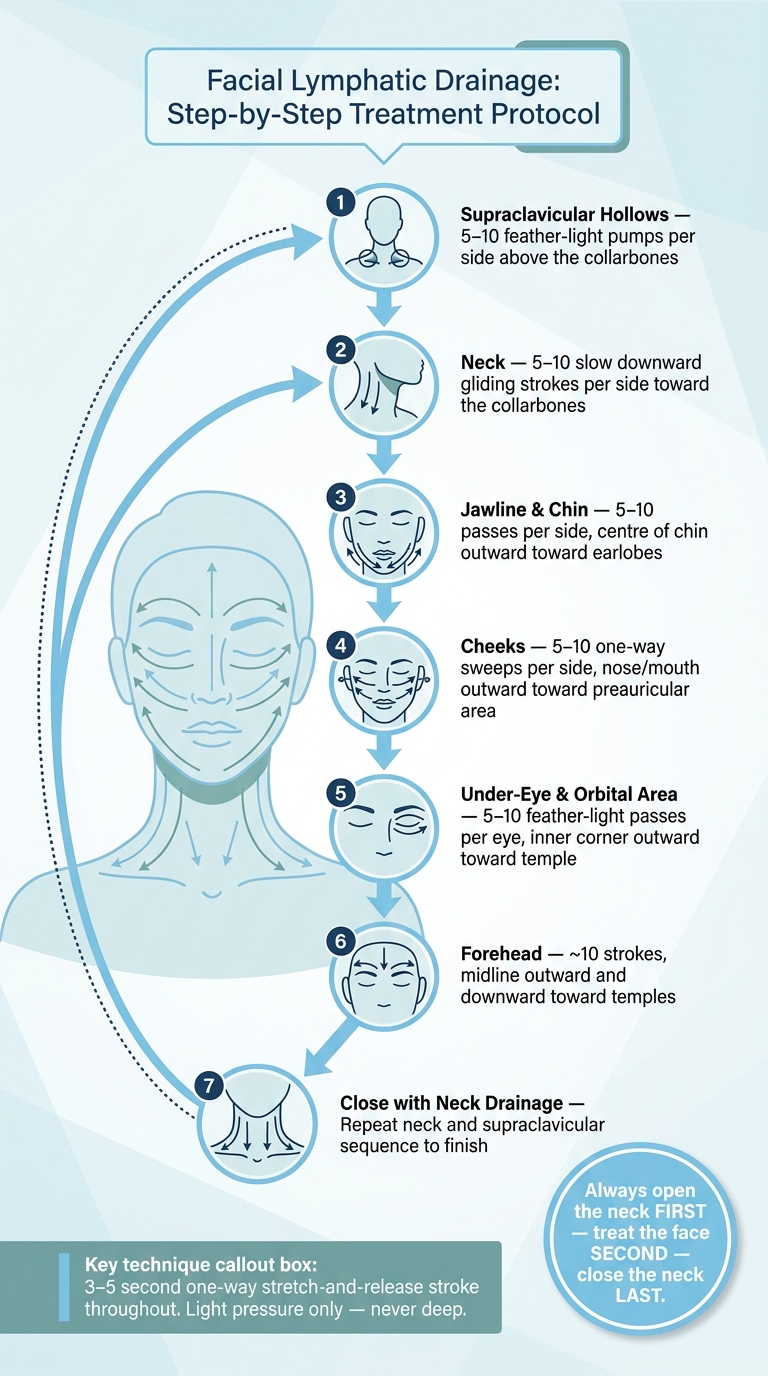
Facial Lymphatic Drainage Protocol: Step-by-Step Treatment Flow
Standard treatment flow: neck, jawline, cheeks, eyes, and forehead
Start by opening the supraclavicular and neck pathways. Then move from the centre of the face outward, and finish with neck drainage again.
- Supraclavicular hollows: Using broad fingertip contact just above the collarbones, apply 5–10 feather-light pumps per side. This helps open superficial drainage.
- Neck: Glide both hands down each side of the neck toward the collarbones, 5–10 slow strokes per side. Keep contact broad and pressure barely perceptible.
- Jawline and chin: Place fingertips at the centre of the chin and glide outward along the jaw toward the earlobes, 5–10 passes per side. The direction is toward the preauricular area, not back toward the midline.
- Cheeks: Starting from the sides of the nose and mouth, sweep outward along the zygomatic arch toward the preauricular area. Repeat 5–10 times per side with slow, one-way strokes.
- Under-eye and orbital area: Use the lightest touch possible here. Sweep from the inner corner of the eye outward along the orbital rim and brow bone toward the temple, 5–10 passes per eye. No tugging and no pressure on the eyeball.
- Forehead: Start at the midline and glide outward and slightly downward toward the temples, then down toward the neck. About 10 strokes is enough for this zone.
- Close with neck drainage: Repeat the neck and supraclavicular sequence to finish the drainage route.
Use a 3–5-second, one-way stretch-and-release stroke throughout.
How to adjust pressure, tempo, and focus areas by puffiness pattern
Keep the sequence the same. Change only the time spent and the number of passes.
For periorbital swelling, extend the orbital work to 10–20 feather-light passes per eye and spend 8–10 minutes on that area. After each orbital pass, follow with strokes down the side of the face and neck so the exit route stays clear.
For lower-face fullness along the jawline, chin, or jowl area, increase the chin-to-ear and jaw-to-neck passes to 10–15 repetitions per side. Put extra attention on drainage toward the preauricular and cervical nodes.
For generalised morning puffiness, use the full standard sequence but spend a bit more time on the cheeks and forehead. A seated or semi-upright position can also help, since gravity gives a passive assist.
Pressure stays very light across all patterns. The fix is more time and more passes, not more force. If a client feels pressure in the throat, dizziness, or discomfort, reduce intensity right away. Redness or petechiae means the pressure is too firm and needs to be reduced at once.
Tool options: hands-only, gua sha, rollers, and microcurrent
Choose the tool only after the manual sequence is in place.
Hands-only work is the most flexible choice. It gives instant feedback through touch, lets you make small changes in the middle of a stroke, and puts the least mechanical load on the skin. That’s why it’s the default for reactive, post-procedure, or highly sensitive clients. Every other tool should sit on top of a strong manual base, not replace it.
The table below compares the four main tool options used in lymphatic-focused facial services.
| Tool | Primary depuffing benefit | Pressure level | Typical treatment time | Cleaning and disinfection | Best skin suitability |
|---|---|---|---|---|---|
| Hands-only | Maximum directional control; follows anatomy precisely | Feather-light | 30–45 min (full protocol) | Hand hygiene before and after each client | All types, including reactive and post-procedure |
| Gua sha | Longer continuous strokes; efficient fluid mobilisation along jawline and cheeks | Light; tool held at a 15–45° angle | 15–30 min when used mid-protocol | Mild cleanser + intermediate-level disinfectant compatible with stone or metal; fully dry before storage | Most types; avoid over active breakouts, fragile capillaries, or very thin skin |
| Facial rollers | Repetitive rolling supports superficial flow; gentle product penetration | Very light | 10–20 min as a complement or standalone refresh | Same as gua sha; store in a closed, labelled container | Sensitive, acne-prone, or maintenance-focused clients |
| Microcurrent | Supports drainage with slow, gliding movements | Light; effect comes from current, not pressure | 15–25 min after manual neck opening | Manufacturer-approved probe cleaning solution; disposable probe covers where recommended | Suitable for most; screen for pacemakers, pregnancy, epilepsy, metal implants, or broken skin |
When using a microcurrent facial toning device, open the neck pathways manually first. Then guide the probes from jaw to ear, cheek to ear, and forehead to temple, using enough conductive gel the whole time. In Canada, practitioners should check that any microcurrent device meets local electrical and medical device rules and follow the manufacturer’s directions for intensity settings and session length.
Aftercare, treatment frequency, and key takeaways
Immediate aftercare and warning signs clients should know
Once the drainage sequence ends, aftercare helps the result last longer. It also helps slow the return of fluid.
Ask clients to sip water steadily through the day. For the next 24 hours, they should avoid high-sodium foods, alcohol, and too much caffeine. Heat exposure and hard workouts should wait 24 to 48 hours, especially if the skin is reactive. Light walking is fine. Strenuous exercise and heavy lifting should be avoided for 24 hours.
A simple traffic-light framework makes this easier to explain:
- Green (expected): mild skin warmth or flushing, slight fatigue, or increased urination
- Yellow (call the clinic): lingering dizziness or a mild headache that doesn't resolve with rest
- Red (seek medical care immediately): worsening pain, rapidly spreading redness and heat, fever, sudden one-sided swelling, chest pain, or shortness of breath
Give each client a written aftercare card. That small step can prevent confusion later.
Treatment scheduling, progress tracking, and service integration
Use your aftercare notes and photos to guide the timing of the next visit. A common starting point is weekly sessions, then a shift to monthly maintenance. If swelling sticks around, a short intensive phase may make sense. The main thing to watch is whether the swelling clears and stays down between appointments.
Track progress with standardised before-and-after photos and mm-based measurements at key landmarks. Photos tell part of the story. Measurements help back that up.
If a client is also getting injectables or has had facial surgery, get clearance from the injector or surgeon before treatment starts again. Document that clearance when needed, and stay within your provincial scope-of-practice limits.
Conclusion: Core rules for safe, effective facial lymphatic drainage
The rules are straightforward: know where fluid drains, screen clients with care, use feather-light directional pressure, and follow a neck-to-face-to-neck flow. Written aftercare should always be part of the session, not something tacked on at the end. That includes hydration, lower sodium intake, avoiding heat, and watching for red-flag symptoms.
The full service cycle is simple: screening → drainage → aftercare → reassessment.
FAQs
How quickly do results fade?
The available information does not say how long results from facial lymphatic drainage treatments last.
Can I do facial lymphatic drainage after filler or surgery?
Consult the client’s medical provider or a qualified cosmetic injector before performing facial lymphatic drainage after filler procedures.
Because fillers are clinical injectables, Beauty Pro Supplies Canada recommends that you check with your insurer and the relevant governing bodies before adding new treatments or procedures to your service protocols. That helps support client safety and keeps your work within your scope of practice.
What pressure should I use with gua sha or rollers?
The available information does not specify how much pressure to use with gua sha or rollers.
If you want professional guidance on aesthetic techniques, equipment protocols, and training, Beauty Pro Supplies Canada offers resources for beauty professionals in Canada.
Leave a comment