

7 Cryotherapy Tools For Aesthetic Clinics
If I were choosing cryotherapy tools for a Canadian clinic today, I’d match the tool to 3 things first: treatment type, cleaning time, and fridge rotation. That matters more than hype. Some tools cover the full face, some work best on small areas, and some are easier to disinfect between clients. Prices can start around $20–$50 CAD for basic sets and reach $80–$400 CAD+ for pro-grade options, with full room setups often landing near $1,000–$3,000 CAD.
Here’s the short version:
- Ice globes: best for broad cooling after facials
- Cryo hammers: more controlled passes on smaller zones
- Cooling wands: close work around the eyes, nose, jawline, and neck
- Cold rollers: fast de-puffing across medium areas
- Ice masks: hands-free full-face cooling for 5–10 minutes
- Cryo sticks: small-area cooling after injectables or extractions
- Cooling cups: in-between option for local facial areas
I’d also screen every client before use. Cold tools are not a fit for clients with cold urticaria, Raynaud’s phenomenon, cryoglobulinemia, poor circulation, open wounds, or active infection. And for reactive or rosacea-prone skin, I’d stick to shorter sessions and tools chilled in a fridge, not a freezer.
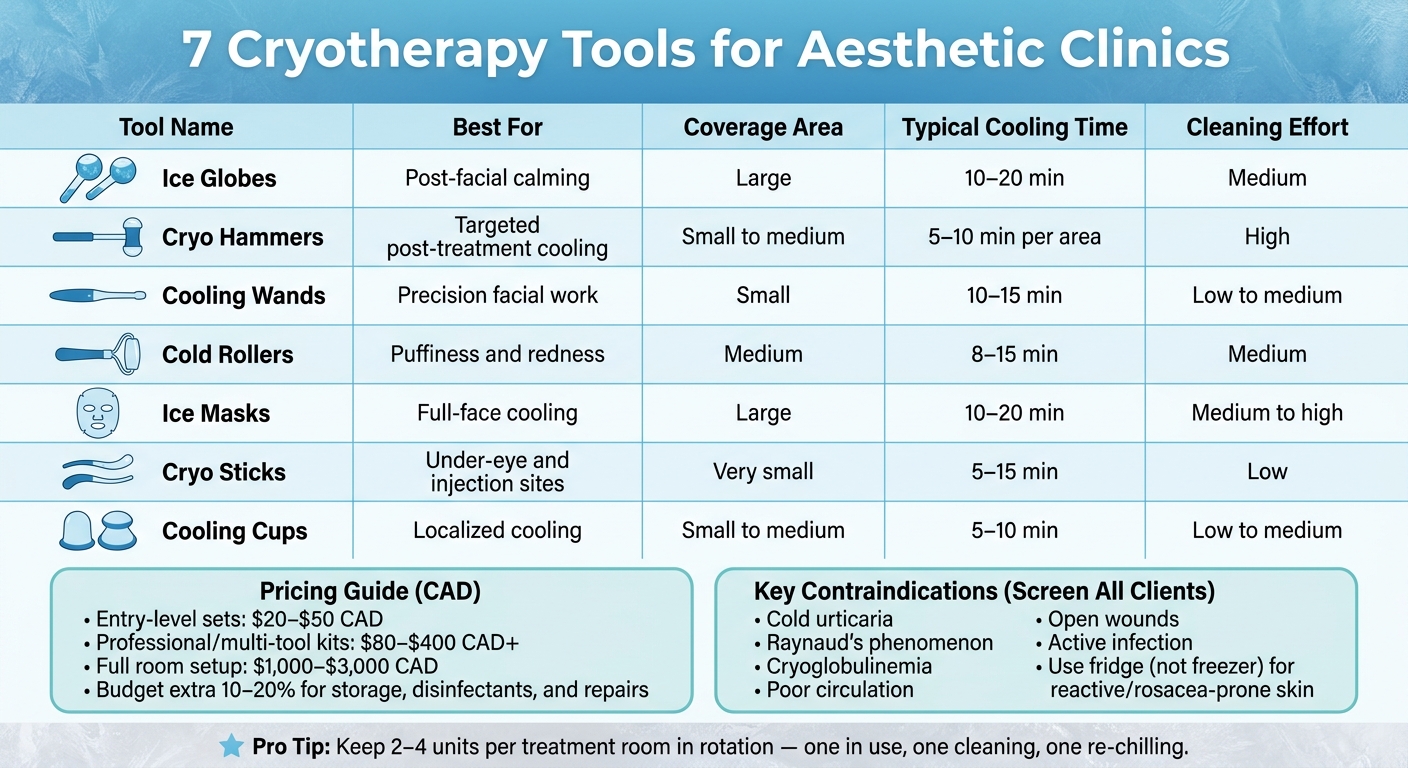
7 Cryotherapy Tools for Aesthetic Clinics: Quick Comparison Guide
Quick Comparison
| Tool | Best for | Coverage | Typical cooling time | Cleaning effort |
|---|---|---|---|---|
| Ice Globes | Post-facial calming | Large | 10–20 min | Medium |
| Cryo Hammers | Targeted post-treatment cooling | Small to medium | 5–10 min per area | High |
| Cooling Wands | Precision facial work | Small | 10–15 min | Low to medium |
| Cold Rollers | Puffiness and redness | Medium | 8–15 min | Medium |
| Ice Masks | Full-face cooling | Large | 10–20 min | Medium to high |
| Cryo Sticks | Under-eye and injection sites | Very small | 5–15 min | Low |
| Cooling Cups | Localized cooling | Small to medium | 5–10 min | Low to medium |
Bottom line: I’d buy tools that fit the service menu, hold cold long enough to finish the job, and work with the clinic’s disinfecting steps without slowing down the room.
sbb-itb-8ec3e54
Why Clinics Use Localized Cooling Tools
Purpose-built cooling tools give clinics a steady level of cold, a smooth surface that moves well across the skin, and easier sanitation than standard ice packs. That kind of consistency helps clinics get more repeatable results and keep the workflow clean and simple.
Common Treatment Uses In Aesthetic Clinics
One of the most common uses is post-facial calming. After exfoliating treatments, extractions, or stimulating masks, a chilled globe or roller can be glided over the skin with light, upward strokes. This often helps bring down short-term redness and heat within minutes. Many practitioners add this as a finishing step after hydrating or brightening facials.
Another common use is under-eye and event-prep de-puffing. Light, directed passes under the eyes may help move fluid and temporarily reduce puffiness. That’s why these tools often show up before photo shoots, filming, and special events.
Clinics also use cooling tools to support comfort after non-invasive services such as LED therapy, microdermabrasion supplies, superficial peels, or non-ablative radiofrequency. During injectables, contact cooling can reduce pain and bruising versus no cooling. These tools are cosmetic support aids, not medical treatments, and they do not replace physician-directed care or prescribed therapies.
Basic Cautions And Contraindications
Cooling tools need careful screening before use. Clients with cold urticaria, Raynaud's phenomenon, cryoglobulinemia, or vascular disease should generally avoid facial cold therapy. In these cases, cold exposure can trigger serious vascular responses.
Extra care is also needed with rosacea-prone, reactive, or barrier-impaired skin. Cold that isn’t well controlled can worsen redness, harm the skin barrier, or lead to rebound flushing once the vessels reopen. For these clients, shorter sessions with tools that are refrigerated, not frozen, are usually the safer option. If stinging or flushing starts, stop right away.
Cooling should never be used over open wounds, active infections, cold sores, or any area where the treating provider has set direct post-procedure limits. If there’s any uncertainty, follow the provider’s protocol instead of the client’s comfort request.
These limits help shape which tool makes sense for each treatment.
1. Ice Globes
Ice globes are a common cooling tool in aesthetic clinics. They’re usually made from glass or stainless steel, and they’re most often used to calm the skin after more intensive treatments.
Teams tend to use them for broad-surface cooling across the face, neck, or body. So they work best for gentle finishing passes, not for tight, highly precise cooling.
For cleaning, start by removing any visible residue from non-porous globes. Then disinfect them with a DIN-registered wipe and leave it on for the full contact time before air drying. In Canadian clinics, a disinfectant should have a Drug Identification Number (DIN), which shows it meets national safety standards.
When you’re ordering, the material matters. Stainless steel tends to handle frequent disinfection better, while glass needs more careful handling. It also helps to check that the globe size fits the treatment areas you work on most. And if you buy from a Canadian supplier, you can cut down on customs delays and make restocking easier.
For smaller, more precise areas, clinics often switch to more targeted cooling tools.
2. Cryo Hammers
For smaller, more controlled cooling than ice globes, cryo hammers use a metal or ceramic head for targeted facial passes. Their shape makes them handy along facial contours, including the cheeks, jawline, forehead, under-eye area, chin, and around the nose.
Clinics often use them after facials, exfoliation, microneedling, laser services, or injectables. That makes them a good fit for fast finishing steps when you want a calm, polished end to the appointment.
Because the contact head is smaller and easier to control, a cryo hammer works better for short finishing passes than full-face coverage. In a busy clinic, that matters. Staff can add a steady cooling step without adding much time to the service.
For cleaning, use the manufacturer-approved disinfectant for the tool's material. Wipe the surface well after each client, dry it fully, and check seams or joints where residue can build up.
When buying, focus on a few things:
- Temperature retention
- Weight balance
- Grip comfort
- Durability
- CAD pricing
- Shipping timelines in Canada
- Replacement availability
- Wholesale ordering support
Screen clients before use. Avoid use on areas with cold urticaria, Raynaud's phenomenon, impaired circulation, open wounds, active infection, or reduced sensation.
3. Cooling Wands
After larger tools like ice globes and cryo hammers, cooling wands give you the most precise handheld cooling. Their slim shape makes it easier to work on small, curved areas like the under-eye zone, cheeks, jawline, around the nose, and the neck.
That makes them a strong fit for spot-cooling a flushed patch after extractions, superficial peels, or dermaplaning. Bigger tools just can’t get into those spots as neatly. The key is technique: keep the wand moving in short gliding passes, don’t hold it in one place, and limit contact to a few minutes per area.
This kind of precision still comes down to controlled temperature, not extreme cold. Some electronic cooling wands use cool settings around 10–14 °C. Tools chilled in a refrigerator instead of a freezer tend to stay in a more controlled range and are usually safer for sensitive skin.
Clean the contact surface with a DIN-registered, material-compatible disinfectant after every client. Also check charging ports and recessed seams closely, since residue can build up there pretty easily.
If you're ordering in Canada, look at the practical details first:
- Durability
- Ergonomic grip
- Temperature consistency
- Battery life
- CAD pricing
- Warranty coverage
- Canadian shipping support
Put extra weight on supplier support, warranty coverage, and fast Canadian shipping.
Avoid use on broken skin, active flares, compromised circulation, or cold-sensitive conditions.
For broader coverage, cold rollers cool the surface faster, but with less precision.
4. Cold Rollers
Cold rollers sit in a useful middle ground. They’re more targeted than an ice mask, but they cover more area than spot cooling. That makes them handy for calming redness and puffiness after treatment. After microneedling or IPL, the rolling motion may also help shift fluid around the under-eye area and cheeks.
Keep the motion light and gentle. Let the cold do the work instead of pressing into the skin. Under the eyes, roll from the inner corner outward. Across the cheeks, move from the nose outward. Keep contact to about one minute per area, and keep the full session under 10 minutes. Don’t roll over the eyelids. Stop right away if the client reports pain, burning, sharp numbness, or if the skin looks blanched or mottled.
After each client, clean the roller head fully:
- Wash and rinse it
- Dry it completely
- Disinfect it with a material-compatible disinfectant
- Store it in a sealed, labelled container or pouch between uses , or use a dedicated implement sterilization tray for organized processing.
For clinic use, pay attention to a few roller-specific details. A smooth, seamless rolling surface matters. So does an ergonomic grip, easy access around smaller facial areas, and cold retention for at least 5–10 minutes after the roller comes out of the fridge or freezer. It also helps to keep more than one unit in each treatment room so you’re not waiting for one tool to chill again. In Canada, suppliers should offer professional-grade rollers, infection-control guidance, and domestic shipping.
Skip cold rollers on broken skin, active infections, or for clients with circulatory disorders or cold sensitivity. If a roller has been kept in a very cold freezer, let it warm slightly before first contact. That matters even more in colder months, when skin perfusion may already be lower.
For broader, hands-free coverage, the next option is the ice mask.
5. Ice Masks
When you need broader, full-face cooling, move up to an ice mask. Ice masks cover much more surface area than rollers or globes, so they’re a good fit after peels, laser, microneedling, or intensive facials when the whole face needs even cooling.
Because they cool the face all at once, they can help calm erythema, puffiness, and that post-treatment heat or stinging feeling. Most masks stay on for 5–10 minutes. If the client has sensitive skin, start closer to 2–5 minutes. And if the mask feels too cold straight from the fridge or freezer, let it sit at room temperature for a short time before placing it on the skin.
What sets ice masks apart from rollers or globes is their hands-free, fixed coverage. Once the mask is on, staff can turn to other parts of the appointment. That’s a big help during busy bookings when timing matters and the treatment still needs to keep moving.
Cleaning depends on the mask type. Reusable silicone or hard-shell masks can be washed with warm water and mild soap, then disinfected with a compatible medical-grade product after each use. Gel-filled or fabric-surface masks need a lighter touch. Skip harsh solvents, since they can damage the outer layer or lead to leaks. Dry the mask all the way, then store it in a clean, covered container in the fridge or freezer between uses. Single-use hydrogel or sheet masks save cleaning time, but they add repeat consumable costs.
When buying, focus on a few practical things:
- Leak resistance
- Anatomical fit
- Stable temperature across the full treatment window
Gel and phase-change materials usually hold their temperature better than simple water-filled designs. It also helps to plan for 2–4 masks per treatment room so one can chill while another is being used. In Canada, buying from local suppliers can make CAD budgeting simpler and may help with support and training access.
For smaller, more targeted cooling, the next option is cryo sticks.
6. Cryo Sticks
After larger cooling tools, cryo sticks take care of the smallest facial areas. These are slim, chilled metal tools made for precise cooling on tight zones of the face. Their shape makes them a good fit for the under-eye area, nasolabial folds, jawline, temples, and the area around the mouth.
Because they’re narrow, you can work close to the orbital rim without touching the eye. That makes them a practical pick after injectables and other facial treatments, where control matters.
In clinics, cryo sticks fit nicely as a quick finishing step after resurfacing or injectable services. In spa settings, they also work well during facial massage over serums or sheet masks. The usual approach is simple: use upward and outward strokes from the centre of the face toward the ears. This can help shift fluid and soften the look of puffiness.
For cleaning, treat cryo sticks like reusable, non-porous metal tools:
- Remove any residue with warm water and a neutral detergent.
- Disinfect with a metal-safe, DIN-registered disinfectant for the full label contact time.
- Let the stick air dry fully before storing it in a clean, closed container in the fridge.
When choosing a set, look for stainless steel, a smooth polished finish, balanced weight, and enough units to rotate between uses. Beauty Pro Supplies Canada can help clinic teams with CAD ordering and restocking.
For broader, hands-free cooling, the next tool is cooling cups.
7. Cooling Cups
Cooling cups are small handheld tools used before or after aesthetic treatments. They cool medium-sized areas and glide in a controlled way over curved parts of the face and neck. In practice, they sit between cryo sticks, which give you more pinpoint control, and ice masks, which cover more surface area. That in-between role makes them a handy fit in a clinic’s cooling setup.
Compared with cryo sticks, cooling cups give you a slightly larger cooling surface without feeling hard to guide. In day-to-day clinic use, they’re a good finishing step after a facial, peel, or injectable service. Move them with gentle upward and outward strokes across the face. On the neck, use soft downward passes if that fits your protocol. The main thing is simple: keep the cup moving and don’t leave it sitting too long on thin or recently treated skin.
Cleaning matters here. Seamless, non-porous cups are easier to disinfect well than textured or mixed-material options. Seams and rough areas can hold onto product, which makes proper disinfection more difficult. Use a DIN-registered disinfectant and follow the full label contact time.
When you’re choosing cooling cups, pay attention to the details that matter for this tool type:
- Thermal shock risk for glass
- Seam-free construction
- Set size for rotation between clients or treatments
Non-porous materials like silicone, glass, and stainless steel tend to hold up well with repeated disinfection. If you go with glass, chill it in the refrigerator instead of the freezer to lower the chance of cracking. Prices change based on material, set size, and supplier. Beauty Pro Supplies Canada can supply professional-grade cooling cups for CAD orders. That makes cooling cups easy to compare in the table below.
Quick Comparison Table For Clinic And Spa Teams
Use this chart to line up each tool with the way your team actually works. It compares contact area, common use, cooling time, cleaning load, and the setting where each tool tends to fit best.
| Tool | Contact Area | Typical Use | Cooling Duration | Cleaning Load | Best Fit |
|---|---|---|---|---|---|
| Ice Globes | Full face (forehead, cheeks, jawline, under-eye) | Full-face calming and de-puffing | 10–20 min | Moderate (glass or steel) | Day spas, hybrid medspas |
| Cryo Hammers | Targeted facial and small body zones | Targeted post-procedure cooling | 5–10 min per area | High (parts and seams) | Medical aesthetic clinics, laser and energy-based practices |
| Cooling Wands | Face and neck | Precision cooling for small facial zones | 10–15 min | Low–moderate (smooth solid metal) | Hybrid medspas, skin-focused clinics |
| Cold Rollers | Face, neck, décolleté | De-puffing and post-treatment calming | 8–15 min | Moderate (seams and joints) | Day spas, entry-level medspas |
| Ice Masks | Full face (sometimes jawline) | Even post-procedure cooling across the full face | 10–20 min | Moderate–high (fit, edges, inserts) | Medical spas, skin clinics |
| Cryo Sticks | Small, precise areas (under-eye, injection sites, nasolabial folds) | Spot cooling after injectables or extractions | 5–15 min (intermittent) | Low (solid metal) | Injectable clinics, dermatology offices |
| Cooling Cups | Localized facial or small body areas | Short spot cooling after peels or extractions | 5–10 min | Low–moderate (solid vs. gel-filled) | Clinics with a mix of facial and small-area device work |
Fridge space and rotation planning matter most for short-duration tools.
After you narrow down the tool type, look closely at material, storage needs, cleaning time, and supplier support before you place an order. When teams buy too fast, they often miss the day-to-day stuff that makes a tool easy to use - or a pain to keep in rotation.
For ordering, the biggest variables are rotation, storage, and replacement availability.
What To Look For Before Ordering In Canada
After comparing the seven tool types - globes, hammers, wands, rollers, masks, sticks, and cups - the next step is simple: make sure the tool fits your room setup and the treatments you actually offer.
Material, Durability, And Temperature Retention
Start with non-porous materials. That’s the bare minimum. Stainless steel, borosilicate glass, and high-grade non-porous polymers are easier to disinfect and easier to check for wear or damage between clients.
Cold retention matters too. A tool may feel great for the first few minutes, then warm up halfway through the service. That’s not ideal. Ask for temperature-retention data based on your usual room conditions and the length of your treatments.
When you check durability, focus on the spots where tools tend to fail:
- cracked or shattered glass
- leaking seams on fluid-filled tools
- loose roller heads or weak handle joints
It also helps to ask about warranty coverage, drop resistance, and seam integrity before you buy.
Storage, Cleaning, And Workflow Fit
Most reusable cooling tools are better stored in a refrigerator, not a freezer. Freezer storage can lead to condensation, cracked glass, and surfaces that get too cold for safe skin contact.
Your storage setup depends on how your clinic runs. A single-room spa may be fine with a compact bar fridge close to the treatment space. A multi-provider clinic usually does better with a larger central fridge, plus labelled bins or rigid cases so everything stays sorted.
Cleaning needs a close look as well. Confirm that the tool works with your clinic’s approved disinfectant protocol. If a tool has tight crevices or fabric parts that can’t be removed, it can become a headache to maintain. In busy rooms, that’s usually a sign to skip it.
In an injectable room with a fast pace, duplicate sets make life easier. A practical setup is:
- one set in use
- one set being cleaned
- one set re-chilling
That way, the room keeps moving without awkward pauses.
CAD Budgeting And Canadian Supplier Support
Think beyond the sticker price. You’re not just buying the tool - you’re also paying for replacements over time.
Entry-level sets usually start around $20–$50 CAD. Professional stainless steel tools and multi-tool kits can range from $80–$400 CAD or more, depending on the material and the number of pieces in the set.
If you’re outfitting several treatment rooms with a mixed cryotherapy setup, total costs can land around $1,000–$3,000 CAD. It’s smart to add in storage cases, disinfectants, and the odd repair. Those extras can tack on about 10% to 20% to your total spend over the first few years.
Ordering from a Canadian wholesale source can make the process smoother on a few fronts: shipping, restocking, and staff onboarding. Beauty Pro Supplies Canada supports clinic teams with CAD ordering, domestic shipping, and access to online training resources.
These checks help trim down your shortlist before you place the order.
Conclusion
The best tool is the one that fits your treatments, your hygiene routine, and the kind of client experience you want to deliver. So the next move is simple: match the tool to the treatment type and the way your room runs day to day.
For a fast comparison, start with the tools that line up most closely with your service mix. Injectable and laser clinics often get the most use from cryo sticks, cooling cups, and cooling wands. Facial spas often see more use from ice globes, cold rollers, and ice masks.
Before you place an order, make sure the tool works with your disinfecting and turnover process. It should fit your IPAC protocol, your disinfectant, and your reprocessing workflow. Contraindications still matter, too. Screen for Raynaud's phenomenon, cold urticaria, cryoglobulinemia, and poor circulation before use.
Put build quality, disinfectant compatibility, CAD pricing, and Canadian supplier support near the top of your checklist. Beauty Pro Supplies Canada can supply professional cryotherapy tools in Canadian dollars and provide access to online training resources.
FAQs
Which cryotherapy tool should I buy first?
If you’re just getting started with a cryotherapy service menu, ice globes or cold rollers are smart first buys. They’re easy to use, work in many treatments, and slip neatly into standard facial protocols to help cut puffiness and calm the skin.
As your menu grows, you can add more specialised tools like cryo hammers or wands. Beauty Pro Supplies Canada offers professional-grade options for aesthetic clinics.
How many tools should a clinic keep in each room?
It depends on your service volume and your sanitation setup. Keep enough reusable cryotherapy tools in each room so you don’t run out of clean, ready-to-use items during back-to-back appointments.
Used tools need to go straight into disinfectant and then be sterilized after every client. That means having multiple sets on hand helps your team keep the day moving without cutting corners on cleaning and sterilization protocols.
Should cryotherapy tools be stored in a fridge or freezer?
No. Cryotherapy tools like ice globes, cryo hammers, and cooling wands usually don’t need to live in the freezer.
Store them in a clean, dry, temperature-controlled space away from direct sunlight and heat. Then chill them only when you need them for a treatment.
Before putting them away, clean and disinfect each tool thoroughly and follow your facility’s hygiene protocols.
Leave a comment