

Checklist for Choosing AI Skin Analysis Equipment
If I were buying an AI skin analysis device today, I’d cut the shortlist down to four things fast: service fit, scan quality, privacy in Canada, and 3-year cost. That matters when prices can range from $500 to more than $20,000 CAD, and total ownership can land closer to $18,000 to $40,500 CAD over 36 months.
Here’s the short version:
- I’d make sure the device matches the treatments I already sell
- I’d check for RGB, UV, cross-polarized, and 3D modes only if my consults need them
- I’d test whether scores stay similar on repeat scans
- I’d ask where client images are stored and who owns them
- I’d confirm export rights, staff training, warranty, and support in Canada
- I’d compare the full cost, not just the purchase price
A skin analyser can help with consults and progress reviews. But if the workflow is slow, the reports are hard to explain, or the data terms are weak, I’d move on.
| Area | What I’d check first | Why it matters |
|---|---|---|
| Service fit | Skin concerns, imaging modes, team use | The device should match daily consults |
| Scan quality | Resolution, repeat scans, skin-tone coverage | Poor consistency makes follow-ups harder |
| Privacy | Data storage, encryption, ownership | Client image handling matters in Canada |
| Cost | Hardware, software, service, consumables | Sticker price is only part of the spend |
Below, I’ve boiled the article down into a short buyer view so you can spot weak options before booking another demo.
AI Skin & Scalp Analysis Machine Setup & Demo | Smart Beauty Spa Technology | PS-X5PRO
sbb-itb-8ec3e54
Checklist 1: Match the Equipment to Your Services and Scope
Start with service fit before you compare imaging, data, or price. First, make sure the device lines up with the services your clinic provides every day.
Confirm the Skin Concerns and Imaging Modes You Need
Professional AI analysers often flag 10 to 15+ skin concerns, such as dark spots, redness, acne, pores, texture, wrinkles, and moisture levels. The key is simple: match the detection modes to the concerns your clients book most often.
Here are the four core modes and what each one shows:
| Imaging Mode | What It Shows |
|---|---|
| RGB / White Light | Visible surface blemishes, acne, wrinkles |
| UV Light | Sun damage, subsurface pigmentation, porphyrins |
| Cross-Polarized | Redness, vascular lesions, deep pigmentation |
| 3D Modelling | Volume loss, wrinkle depth, skin lifting progress |
If your clinic leans heavily into anti-ageing or injectable consults, 3D facial modelling matters a lot for tracking volume changes over time. If acne treatments make up a big part of your menu, UV and cross-polarized modes will likely do more of the heavy lifting.
For clinics that offer scalp treatments or detailed pore-focused services, it also makes sense to look for a device with a handheld spectral probe for close-up analysis.
Confirm the Device Fits Your Team and Scope of Practice
Be clear about who will use the device each day. That could be an aesthetician, medical aesthetician, or cosmetic injector. The equipment’s intended use should match that person’s scope of practice and your provincial rules.
Use AI skin analysis for screening and progress tracking, not diagnosis. Think of the device as a tool for review and follow-up only.
During a live demo, ask a lead provider to capture an image, generate a report, and walk through it as if speaking with a client. This step tells you a lot. If the workflow feels clunky, or the report takes too much effort to explain, it’ll slow down consultations in the real world. The scan-to-report process should be fast enough to fit into a busy appointment.
Once you’ve nailed down service fit, you can move on to image quality, AI scoring, and progress tracking.
Checklist 2: Verify Image Quality, AI Results, and Reporting
Once you’ve confirmed service fit, the next step is making sure the device gives you data you can actually use. Image quality, score consistency, and clear reports are the difference between a tool that builds client trust and one that ends up collecting dust.
Check Image Quality and Consistency Across Skin Types
Resolution matters more than many vendors admit. Professional-grade systems often use 20-megapixel sensors to pick up fine details like pore size and wrinkle depth clearly enough to track and compare over time.
Standardised positioning matters just as much. If lighting shifts or the client’s head sits at a different angle, repeat scans can become hard to compare. Ask the vendor how the device keeps head position and lighting steady between sessions, including whether it uses chin or head rests.
For Canadian clinics, diversity isn’t a nice extra. It’s a practical filter. Ask plainly whether the AI was trained on Fitzpatrick skin types I through VI. Then ask which skin tones, ages, and textures were part of that training set.
Check AI Scoring, Validation, and Progress Tracking
After image quality, check whether the AI score is steady enough to support consultations. What you need are numerical scores. A colour map on its own doesn’t tell you how much a concern changed.
Ask for published validation against physician assessments and repeat-scan reliability data, not vendor marketing language. During the demo, scan the same person twice and compare the scores yourself. That simple test can tell you a lot.
Check Reports, Exports, and Comparison Tools
Once the score looks steady, confirm that the report is easy to show, save, and compare. Reports should be clear, visual, and written in plain language.
Side-by-side before-and-after views are a must if you want to show clients that treatments are working. Comparing scans every four to eight weeks gives you objective progress to review at follow-up appointments. Also confirm that the device supports PDF, QR code, or email export so clients can look back at their results between visits.
Verify these technical factors before buying:
| Factor | What to Verify |
|---|---|
| Camera resolution | 20 MP or higher for fine detail capture |
| Imaging modes | RGB, UV, and cross-polarised coverage |
| Fitzpatrick coverage | AI trained on skin types I–VI |
| Scoring format | Numerical severity scores, not visuals only |
| Clinical validation | Published data, not vendor marketing claims |
| Repeat-scan reliability | Consistent scores across repeat scans |
| Export options | PDF, QR code, or email |
| Comparison tools | Side-by-side progress views with timestamped scans |
Checklist 3: Review Privacy, Data Storage, and Regulatory Fit in Canada
Image quality matters, but so does the way a device stores and protects client data. The next step is simple: check where the data lives, who controls it, and whether the system lines up with privacy expectations in Canada.
Confirm Where Client Images and Data Are Stored
AI skin analysers usually store data in one of three places: on the device, on a local server, or in the cloud. Ask the vendor where client images and records are stored and backed up. If possible, look for Canadian servers or dedicated North American servers.
If a vendor can’t clearly explain where the data is kept, that’s a red flag for your clinic.
Location is only part of the picture. You’ll also want to confirm that data is encrypted in transit and at rest. And the software should support role-based access, such as admin and staff permissions, so only the right people can view client records.
Confirm Intended Use, Documentation, and Data Ownership
Ask a direct question: who owns the images and client records? Then review the vendor’s privacy terms to confirm that the clinic keeps ownership. Also check whether the vendor keeps any right to use anonymised data for AI training.
The device manual matters too. It should describe cosmetic analysis, documentation, and client education - not diagnosis. If the documentation makes medical claims instead of cosmetic assessment claims, the device may fall under different rules.
During your demo, test the data export process yourself. Confirm that you can export client reports and raw images in standard formats. Also make sure you can delete or move client profiles if you switch systems later. That one detail can save a lot of hassle down the road.
Once the privacy terms make sense, move on to setup, training, and support.
| Privacy Factor | What to Confirm |
|---|---|
| Data residency | Canadian or dedicated North American servers |
| Encryption | In transit and at rest |
| Access controls | Role-based admin and staff permissions |
| Data ownership | Clinic owns the images and records |
| AI training use | Whether anonymised data may be used to train the system |
| Export options | PDF or standard-format exports; deletion or migration supported |
Checklist 4: Compare Usability, Training, Support, and Total Cost
AI Skin Analysis Equipment: 36-Month Total Cost of Ownership in Canada
Once privacy is clear, move to the day-to-day stuff: workflow, support, and total cost. Data controls matter, but they’re only part of the picture. You also need to see how the device holds up in an actual consult.
Check Setup, Workflow, and Staff Training
Test whether scanning, analysis, and reporting fit into a standard consultation without slowing your team down. During the demo, see if staff can complete the full workflow without extra steps or awkward workarounds. If the results are tough to explain in plain language, that’s a sign the device may not work well in a busy clinic.
Onboarding should cover installation, staff training, protocol setup, and user resources. Good vendor training helps staff use the device the same way every time, which makes a big difference once the clinic gets busy.
Check Warranty, Updates, and Canadian Support Coverage
Look past the headline warranty term and check what’s actually covered. Professional warranties are often two years. Software updates matter just as much as the hardware, so ask if updates are included in the purchase price or if they come with a separate annual contract.
For Canadian clinics, local support coverage is a big deal. Confirm the vendor’s average response time for technical issues and whether spare parts are stocked within Canada. Also ask one simple question: Is a loaner unit available during repairs?
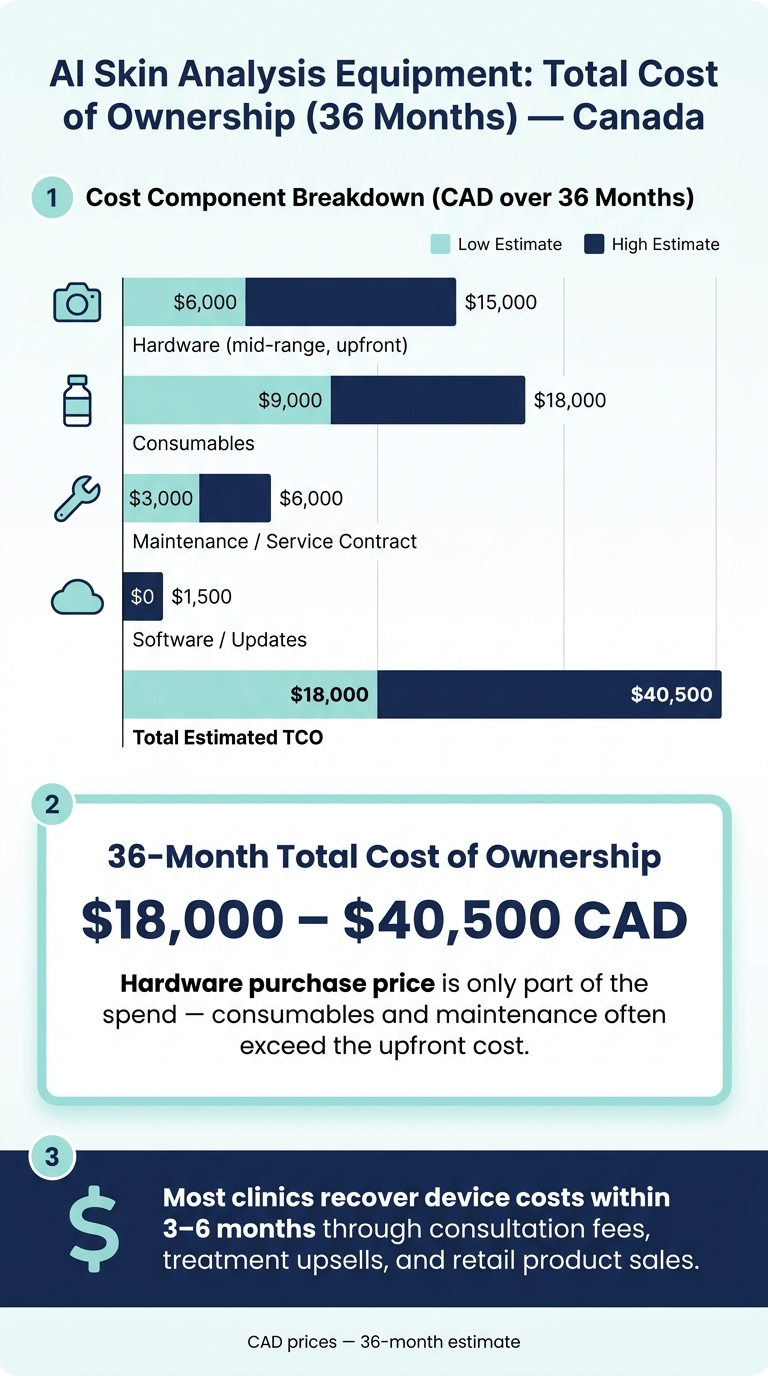
Check Total Cost of Ownership and ROI in CAD
After support, compare the full 36-month cost. Price on its own can send you in the wrong direction. A more useful 36-month total cost of ownership (TCO) includes consumables, maintenance, and software fees, not just the upfront purchase.
| Cost Component | Estimated Cost (CAD) - 36 Months |
|---|---|
| Hardware (mid-range) | $6,000–$15,000 (upfront) |
| Consumables | $9,000–$18,000 |
| Maintenance/service contract | $3,000–$6,000 |
| Software/updates | $0–$1,500 |
| Total estimated TCO | $18,000–$40,500 |
Then model break-even based on consultations, upsells, and retail sales. In many clinics, skin analysis devices are paid off within 3 to 6 months through consultation fees, treatment upsells, and higher retail product sales using professional samples.
Conclusion: The Shortlist Criteria That Matter Most
Keep your shortlist tight. Focus on devices that match your services, deliver steady image quality across skin types, produce clear reports, and work well in a fast consult setting. Once the workflow makes sense, look at compliance, data handling, and ownership terms.
Before you buy, get Health Canada licensing, data storage details, and export rights in writing.
Don’t judge the deal by sticker price alone. Compare the total cost of ownership over 3 to 5 years.
Use the live demo to catch friction early. If the scan-to-report process feels slow, cut that device from the shortlist.
If a device clears these checks, it deserves a spot on your final shortlist. Beauty Pro Supplies Canada also provides equipment and training resources for clinic teams.
FAQs
How do I know which imaging modes my clinic needs?
Start with the skin concerns you see most often. Most professional systems use multi-mode imaging, and a mix of multispectral imaging and 3D modelling usually covers over 80 per cent of clinical needs.
A simple way to think about it: more modes don't always mean a better fit. What matters is whether each one helps you make clearer decisions in consults and treatment planning.
- Visible imaging: the baseline for consultations
- Polarized or cross-polarized imaging: cuts glare and helps show vascular conditions and subsurface pigmentation
- UV imaging: reveals sun damage, bacteria, and pigmentation that may not be obvious under standard lighting
Choose modes for clinical utility, not just quantity.
What should I ask to confirm the AI works well on all skin tones?
Ask the manufacturer for proof that the AI was trained and tested on diverse skin tones, skin types, and ethnicities.
You should also ask if the system can be adjusted by skin type or ethnicity. On top of that, request independent clinical validation that shows the tool stays accurate across a broad range of skin tones.
What hidden costs should I include before buying a device?
Don’t stop at the sticker price. Work out the total cost of ownership instead.
That means adding up more than the machine itself:
- software licensing
- technical support
- maintenance
- calibrations
- replacement parts
- staff training
- shipping
- taxes
- import duties
You’ll also want to factor in per-scan or per-report consumables. Those small costs can add up fast over time.
And there’s one more thing that’s easy to miss: downtime. If the system is out for servicing, your clinic may lose booking capacity and revenue at the same time. A lower upfront price can look good on paper, but the day-to-day costs often tell the real story.
Leave a comment