

Best Practices for Med Spa Onboarding Programs
A med spa onboarding program should do one job first: get new staff to safe, independent work within 90 days. In Canada, that means role limits, PHIPA privacy training, infection control, emergency response, device handling, charting, and clear sign-offs all need to be in place from the start.
If I were building or fixing an onboarding plan, I’d keep it simple:
- Set role limits before day one
- Train by 30-60-90 day checkpoints
- Use mentors, shadowing, and written sign-offs
- Cover both clinical work, medical aesthetics supplies, and front-desk systems
- Track results with audits, check-ins, and staff feedback
A few numbers make the case clear. Clinics without documented SOPs are 3x more likely to face regulatory action after an adverse event. And structured onboarding can improve retention by 82%.
This article explains how to turn onboarding from loose training into a clear system that supports safety, privacy, staff consistency, and day-to-day clinic performance across Canadian med spas.
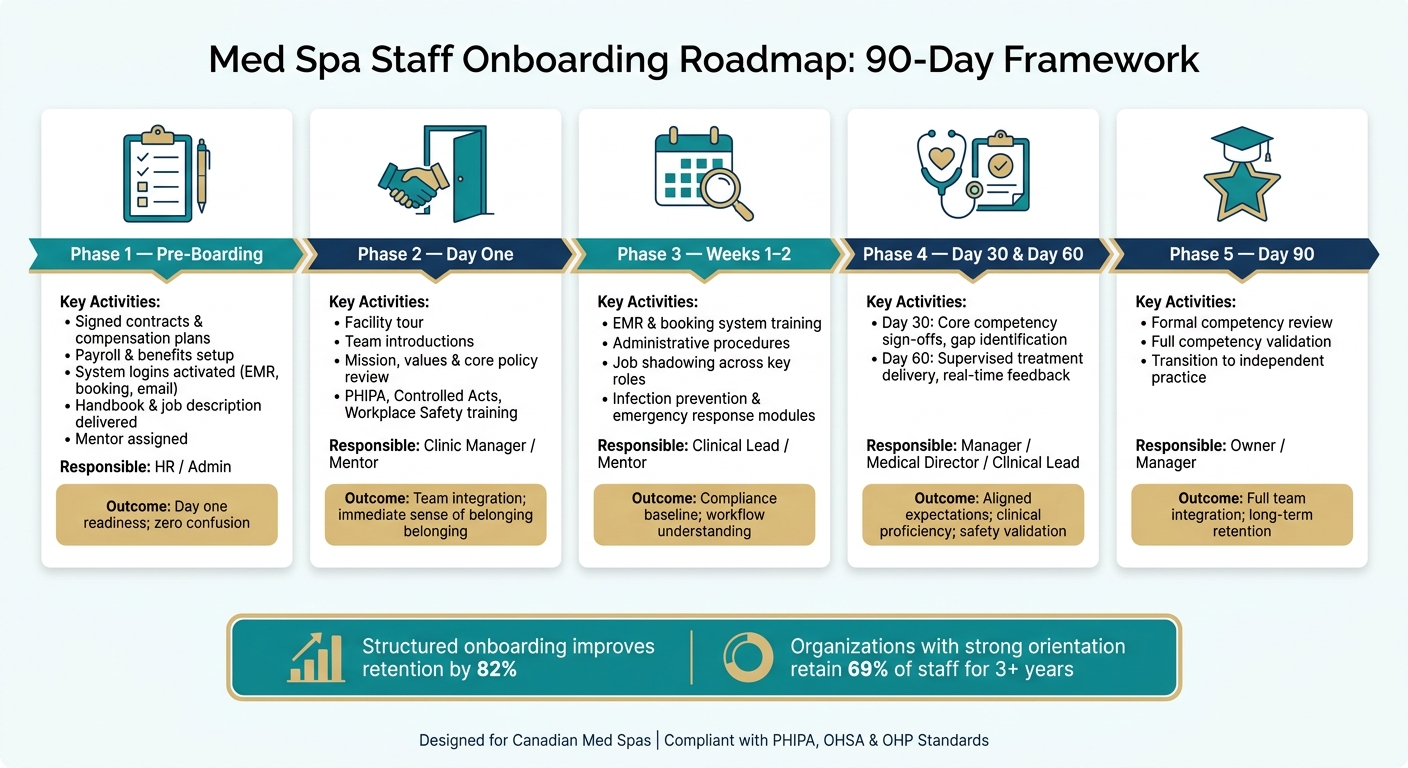
Med Spa Staff Onboarding Roadmap: 90-Day Framework
90 Days to a Successful Med Spa Team – Simple New Hire Onboarding System
sbb-itb-8ec3e54
1. Set onboarding goals, roles, and compliance requirements
Before day one, define the role, reporting line, and permitted duties. That upfront clarity turns training into a checklist instead of a guessing game.
Define role expectations and scope of practice from day one
Every new hire should get a written role description that spells out duties, reporting lines, and treatment limits. In a Canadian med spa, controlled acts such as injections and fillers require proper authorization.
Staff need to know which treatments are covered by a direct order or medical directive. They also must not start clinical work until those documents are current and understood. Medical directors still carry responsibility for oversight and compliance.
A privilege matrix helps here. It maps each treatment to the approved role and the level of supervision required. That cuts out confusion and gives managers a clear audit trail. Credential verification should also happen before day one. Confirm all professional licences directly with the issuing provincial body.
Once that authority is clear, move into the policies every hire has to complete.
Orient staff to core policies, safety rules, and privacy standards
Compliance training should cover privacy, safety, and documentation right away. Use day-month-year dates and 24-hour time in all records.
The table below shows the mandatory compliance topics each new hire must complete, along with the med spa-specific module for each one and a realistic completion target.
| Mandatory Compliance Topic | Med Spa-Specific Module | Purpose | Target Completion |
|---|---|---|---|
| PHIPA Privacy | Client Data & Photo Handling | Protect personal health information and before/after photos | Day 1 |
| Controlled Acts & Delegation | Delegation & Medical Directives | Define legal authority for injectables and medical treatments | Day 1 |
| Infection Prevention | Sanitation & Sharps Safety | Prevent cross-contamination and ensure safe clinical practice | Days 1–3 |
| Workplace Safety | Harassment & Incident Reporting | Meet OHSA requirements for violence, harassment, and emergency exits | Day 1 |
| Informed Consent | Clinical Risk Communication | Ensure clients understand risks and benefits before treatment | Days 1–7 |
| Emergency Response | Anaphylaxis & Vascular Occlusion | Prepare staff for high-risk adverse events | Days 1–14 |
| Out-of-Hospital Premises (OHP) Standards | Premises Safety & Logs | Meet OHP Standards requirements for Ontario clinics | Day 30 |
Each completed module should be signed off and stored in a centralized training record. Once those core modules are done, you can map the rest of the onboarding plan week by week.
With compliance defined, the next step is a step-by-step onboarding roadmap.
2. Build a step-by-step onboarding roadmap
With compliance and role scope locked in, the next move is a calendar-based onboarding roadmap. This is what turns onboarding from a one-off scramble into a process you can repeat, track, and review later if needed. It should cover four stages: pre-boarding, day one, the first two weeks, and the first 90 days.
Prepare before the start date
Before the new hire arrives, the admin side should already be done. Signed employment contracts and compensation plans should be in place. Payroll and benefits should be set up. Logins for the EMR, booking software, and email should be live and tested.
Send the handbook, job description, and service menu before day one. That way, the new hire isn’t walking in cold. Assign a mentor or buddy in advance too, so they know exactly who to contact. The goal is simple: no dead time, no waiting on forms, and no sitting around because access still hasn’t been sorted.
Structure day one, the first two weeks, and the first 90 days
Day one should set the standard. Start with a facility tour, team introductions, and a clear review of the clinic’s mission, values, and core policies. That gives the new hire a sense of how the clinic runs and what’s expected from the start.
In the first two weeks, shift into a more structured orientation. This should move in a clear order through HR topics, admin processes, EMR training, and shadowing across key roles. Then the first 90 days should build from observation to supervised practice and, after that, independent work.
Use the roadmap below to assign tasks and deadlines.
| Time Period | Key Activities | Responsible Staff | Expected Outcome |
|---|---|---|---|
| Pre-boarding | Signed contracts, payroll and benefits setup, system access, handbook delivery, mentor assignment | HR / Admin | Day one readiness; reduced confusion |
| Day One | Facility tour, team introductions, mission and values review | Clinic Manager / Mentor | Team integration; immediate sense of belonging |
| Weeks 1–2 | EMR training, administrative procedures, job shadowing across key roles | Clinical Lead / Mentor | Compliance baseline; workflow understanding |
| Day 30 | Check-in, core competency sign-offs, gap identification | Manager / Medical Director | Aligned expectations; early course correction |
| Day 60 | Supervised treatment delivery, real-time feedback sessions | Clinical Lead / Medical Director | Clinical proficiency; safety validation |
| Day 90 | Formal review, full competency validation, independent work transition | Owner / Manager | Full team integration; long-term retention |
The data backs this up. Structured onboarding programs can increase employee retention by 82%, and organizations with successful orientation programs retain 69% of employees for at least three years.
Use mentors, shadowing, and documented sign-offs
Pair each new hire with a peer mentor for at least the first two weeks. This helps keep the experience steady across hires and gives the new team member one clear point of contact early on. It also cuts down on uneven early performance, which can happen when people are left to figure things out on the fly.
The mentor should help coordinate shadowing across the front desk, treatment rooms, and inventory, including essential disposable kits. Every observation, SOP review, and skills check should be signed and dated. A master training matrix, along with role-specific checklists, makes progress easy to track and keeps the onboarding process ready for review.
3. Train for clinical competence, systems use, and workflow consistency
Use the training matrix and sign-offs from Section 2 to assign clinical, systems, and workflow training by role.
Teach treatment protocols with supervised practice
Clinical training should follow a clear step-by-step path before anyone works on clients alone. Start with shadowing for one to two days. This gives new staff a chance to watch experienced providers, see how consultations move, learn how clients are welcomed, and understand how treatments are carried out.
Then move into supervised practice on models or staff. This part should happen under direct supervision, with feedback given right away. That way, small issues get fixed on the spot instead of turning into habits.
Each treatment category needs its own sign-off. The Medical Director should watch each procedure category before signing off on competency for independent practice. Record each sign-off with the date and the evaluator’s full name, not just initials on a checklist.
For injectables, fillers, and similar treatments, current delegation and direct supervision are required before independent practice. Training should cover:
- consultation flow
- consent
- charting
- adverse-event recognition
Emergency drills should also be built into regular training. If something goes wrong, staff shouldn’t be figuring it out in the moment.
Once clinical skills are mapped, move into systems and documentation training.
Train staff on EMR, booking, inventory, and client communication systems
Staff need hands-on training in EMR, booking, inventory, and messaging tools. That includes chart access, photo storage, and consent recording. Document the training and sign off when the person can do the task properly.
This part matters more than many clinics think. Weak system training leads to day-to-day errors that pile up fast. New hires need to know how to enter booking notes, deal with no-shows and cancellations, log inventory, and use client communication systems the right way.
Different skills call for different training formats:
| Training Format | Best-Fit Use | Advantages | Limitations |
|---|---|---|---|
| Shadowing | Initial orientation and workflow | Low pressure; observes soft skills and client flow | Passive; can be inconsistent between trainers |
| E-Learning | Compliance, theory, and SOPs | Scalable; easy to track completion and retention | Lacks hands-on application; can be isolating |
| Workshops / Demos | New equipment or complex techniques | High engagement; immediate expert feedback | Time-intensive; pulls senior staff off the floor |
| Supervised Practice | Competency validation before independence | Ensures safety; builds new hire confidence | Requires dedicated oversight; limited by patient volume |
Once staff can use the clinic’s systems, the next step is making sure those tools fit the same way into the daily routine for everyone.
Standardize daily workflow across front desk and treatment rooms
Steady daily operations depend on clear SOPs that every staff member follows, no matter how long they’ve been at the clinic. Room setup, turnover protocols, sanitation, infection control, and sharps safety should all be written down and taught directly. None of this should be left to guesswork.
One of the most common weak spots is the handoff between front desk and clinical staff. Standardize pre-treatment paperwork, consent, intake, and post-care handoffs so staff aren’t improvising during busy periods. Front desk staff also need clear rules for check-in, check-out, cancellations, and privacy.
When these steps are standardized, the full client journey feels more consistent - from the front desk to the treatment room.
Next, standardize equipment handling, room setup, and stock control so training also covers the tools staff use every day.
4. Include supplies, equipment, and education in onboarding
Once your workflow is standardized, onboarding needs to cover the tools people touch every day: devices, supplies, storage rules, and routine handling.
Standardize equipment handling, room setup, and stock control
Every new hire should get hands-on training on the exact devices and supplies used in your clinic, not just a broad intro. That means device setup, cleaning, disinfection, and end-of-day shutdown steps should be written into your SOPs and taught during onboarding.
Just as important, every cleaning, maintenance, and shutdown task needs to be documented in the log or EMR. If records are missing, you create compliance risk. Each log should include:
- the date
- the staff member's name
- the device cleaned
- the disinfectant used
For sterilization equipment, also record temperature settings in degrees Celsius and cycle logs.
For consumables and injectables, train staff on FIFO (First-In, First-Out) stock rotation, expiry-date checks, and batch tracking. Injectables should be stored in a medical-grade refrigerator at 2°C to 8°C, with batch numbers and expiry dates logged at each use. Track liquids in mL and count items by unit. A front desk lead or practice manager should oversee inventory counts and flag low stock before it turns into a headache.
End-of-day shutdown steps for high-energy devices like lasers and RF equipment shouldn't be picked up casually on the job. They should be part of every clinical staff member's onboarding sign-off.
Use Beauty Pro Supplies Canada resources to support product and equipment training
Getting professional-grade supplies is only half the job. Staff also need to know how to use them the right way.
Beauty Pro Supplies Canada offers online training and educational resources alongside its wholesale catalogue of medical and spa supplies, equipment, furniture, and tools. That can help reinforce standardized product knowledge and safe handling procedures during onboarding, especially for aestheticians and support staff who are learning new devices or treatment tools for the first time.
Use a sign-off matrix to track competency by item and device.
Build a simple onboarding matrix for supplies and tools
A training matrix keeps onboarding easy to follow and easy to audit. The table below shows the main categories, what the training should cover, storage or handling rules, and who signs off on competency.
| Supply/Equipment Category | Onboarding Training Focus | Storage/Handling Requirement | Sign-off Authority |
|---|---|---|---|
| Injectables | Cold chain management, batch tracking, reconstitution | Medical-grade fridge at 2°C to 8°C; log batch/expiry | Medical Director |
| Laser/Energy Devices | Device setup, calibration, safety protocols, shutdown | Eye protection required; log maintenance hours | Clinical Lead |
| Sanitation & IPAC Supplies | High-level disinfection, chemical indicators, cycle logging | Approved disinfectants; log cycles and temperatures in °C | Practice Manager |
| Consumables | Stock rotation, expiry checks, inventory counts | FIFO method; track liquids in mL and items by unit | Front Desk Lead |
| Emergency Kits | Anaphylaxis response, sharps disposal, vascular occlusion protocol | Monthly expiry checks | Medical Director |
| Device Logs & Photo Uploads | PHIPA-compliant charting, device records, and image handling | PHIPA-compliant access; secure photo upload | Privacy Officer |
Map each item to one competency check and one named sign-off.
5. Measure results and improve the program over time
Track the metrics that show onboarding is working
Once the 90-day roadmap is in place, the next step is simple: check if it’s helping new hires become safe, independent staff.
Look at progress at 30, 60, and 90 days. Those checkpoints show whether a new hire is moving toward safe independence at the right pace. By day 90, the goal should be independent practice. After competency is confirmed, track revenue per provider against clinic targets.
Use role-based checkpoints to see what’s working and where someone may need more support.
| Metric | Data Source | Review Frequency |
|---|---|---|
| Time to first independent treatment without supervision | Booking system / mentor log | Monthly (first 90 days) |
| Competency sign-off completion | Skills checklists | Weekly (first 30 days) |
| Documentation accuracy | EMR chart audits | Monthly |
| Regulatory training completion (PHIPA, infection prevention) | Training matrix | End of Week 1 and Week 4 |
| Booking accuracy and schedule adherence | EMR / POS system | Monthly |
| Client satisfaction / rebooking rate | Post-treatment surveys / EMR | Monthly |
| Revenue per provider | Financial reports | Monthly |
Use feedback, audits, and updates to keep training current
Use 30-, 60-, and 90-day check-ins to spot gaps early, before they turn into habits. Get feedback from mentors, managers, and new hires in writing. That gives you something concrete to work from, not just vague impressions.
Then use that feedback to:
- fix repeat gaps
- make expectations clearer
- help staff reach safe independence sooner
Audit findings should feed back into your checklists after each review. If charting errors keep showing up, update the checklist. If a handoff step keeps getting missed, tighten the process. Small fixes here can prevent bigger problems later.
Quarterly emergency drills matter too. Run them, document performance gaps, and fold those lessons into training. And when you bring in a new device, add a new treatment, or change clinical protocols, don’t rely on a memo alone. Treat that change as a trigger for a focused reboarding session.
The Medical Director stays responsible for staff competence, remediation, and documented follow-up when gaps appear.
Use these results to sharpen the next onboarding cycle.
Conclusion: The core elements of a strong med spa onboarding program
Strong med spa onboarding brings together role clarity, phased training, compliance, standardized workflows, and measurable follow-up. When those pieces are in place, onboarding stops feeling like paperwork and starts doing real work. It becomes the base for safer care, smoother day-to-day operations, and a steadier client experience.
There’s also a clear business case. Structured onboarding can increase retention by 82%, which makes it a direct operational win in a high-risk, high-turnover setting.
"Having a consistent pre-boarding and onboarding process in place and a structured new employee orientation sets the tone for the entire employee experience. You cannot expect your employees to do what they never are shown how to do." - Dana Hatch, Director of Client Success, APX Platform
FAQs
Who should own onboarding in a med spa?
Onboarding in a medical spa is a team effort.
Clinical leaders and managers usually handle day-to-day training. The medical director, however, holds final responsibility for clinical oversight. That includes competency checks and supervision of delegated medical acts.
On the operations side, owners or practice managers often lead the new hire’s introduction to how the business runs and how the team works together. At the same time, authorized professionals still make clinical decisions within their scope.
To keep things consistent, many medical spas use mentors and standard checklists. That makes training easier to follow and helps document safety steps, competency requirements, and sign-offs.
What should a 90-day onboarding checklist include?
A strong 90-day onboarding checklist should cover clinical, operational, and compliance basics, with dedicated leadership time and one consistent mentor.
It should include:
- Days 1–30: fundamentals, culture, and observation
- Days 31–60: supervised practice
- Days 61–90: increasing independence
- a training matrix, signed SOP acknowledgements, and skills checklists
- privacy, consent, safety, scope-of-practice training, and 30-, 60-, and 90-day check-ins
How do you know when a new hire is ready to work independently?
A new hire can work on their own after they complete a structured training program and their clinical competency has been verified. The medical director, or a designated supervisor, should directly observe each specific procedure and formally sign off on it.
That sign-off should be supported by clear documentation. This includes signed skills checklists, completed onboarding modules, and proof that the person’s training matches your practice’s procedure-to-credential matrix.
Leave a comment