

How to Choose Dermaplaning Blades for Your Clinic
If I had to keep this simple, I’d start with two blades: #10R and #10. The #10R gives me more control on small or reactive areas. The #10 works well for general facial work on broader zones. I’d only bring in #14 or #10D after checking staff skill, treatment demand, and product details.
Here’s the short version:
-
Match the blade to the area
- #10R: nose, jawline, upper lip, curved spots
- #10: general facial dermaplaning
- #14: larger facial areas like cheeks and forehead
- #10D: check the maker’s specs before buying
-
Match the blade to the skin
- Sensitive, mature, or rosacea-prone skin: use #10R
- Thicker or oilier skin: use #10 or #14
- Active acne, open lesions, sunburn, or rosacea flare: do not treat
-
Keep the workflow safe
- Use sterile, single-use blades
- Fit blades to a No. 3 handle if compatible
- Put the sharps container within arm’s reach
- Record blade type, lot number, and expiry date
-
Plan stock with a simple formula
- Weekly treatments × 4 × 1.1
- Then add a 10% to 20% buffer for delays and busy months
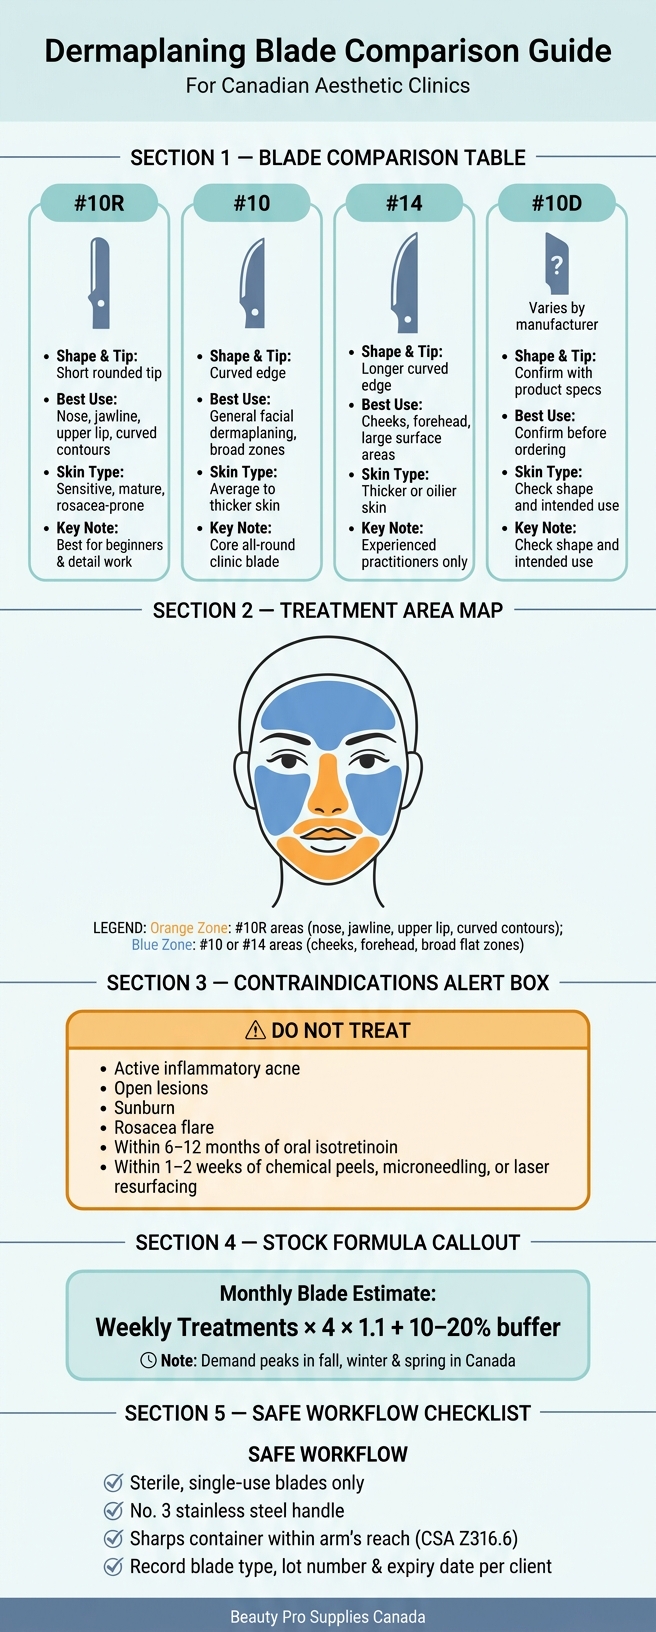
Dermaplaning Blade Guide: #10R vs #10 vs #14 vs #10D
Dermaplaning Blades: Everything You NEED To Know
Understanding the nuances of different blades is essential for any professional using dermaplaning supplies in their practice.
sbb-itb-8ec3e54
Quick Comparison
| Blade | Best for | Skin/Area Fit | Main note |
|---|---|---|---|
| #10R | Detail work | Sensitive, mature, curved areas | More control, rounded tip |
| #10 | General use | Average to thicker skin, broad facial zones | Good core clinic blade |
| #14 | Large areas | Cheeks, forehead, thicker skin | Better for experienced staff |
| #10D | Varies by maker | Must be checked before ordering | Confirm shape and intended use |
My takeaway: keep the kit small with a dermaplaning blade sampler bundle, use one blade per client, defer treatment when skin is not fit for dermaplaning, and make staff notes tight and consistent. Following a standardized dermaplaning facial treatment protocol helps maintain this consistency. That’s the safest way to keep results even from one appointment to the next.
Dermaplaning blade types and materials explained
Dermaplaning blade choice comes down to three things: edge shape, size, and how well the blade fits the area you're treating. That choice affects both control and results, so once you've picked the right size for the job, the next step is matching the blade profile to the treatment area.
Most professional dermaplaning blades follow standard scalpel blade patterns. That means the blade number gives you a fast read on the edge shape. In Canadian clinic settings, the most common patterns are #10, #10R, and #14. If you're looking at a #10D, check the manufacturer details before you order. Profiles can vary, and so can the intended use.
All listed blades are surgical-grade stainless steel.
| Blade | Shape & Tip | Best Use |
|---|---|---|
| #10 | Curved edge | General facial dermaplaning, broad zones |
| #10R | Short rounded tip | Small, curved areas; curved contours |
| #14 | Longer curved edge | Broad facial zones, larger surface areas |
| #10D | Confirm manufacturer profile before stocking | Confirm intended use with product specifications |
Use the blade profile to match control to the treatment area.
When to use #10, #10R, #14, and #10D
The #14 works well on broad facial zones. Its longer edge covers more surface area with each pass, which helps on larger areas. Many technicians pair it with the #10R when they need to shift from wide coverage to detail work.
The #10 is a dependable all-round option for general facial dermaplaning. If you want one blade pattern that handles a lot of day-to-day facial work, this is often the one people reach for.
The #10R is better suited to smaller, curved areas like the jawline, nose, and upper lip. Its short rounded tip helps reduce the chance of snagging or scratching the skin. That makes it a smart pick for beginners and for tighter facial contours where hand control matters more.
For the #10D, confirm the blade profile and intended use with the manufacturer before stocking it.
How blade shape affects control on the skin
Blade shape has a direct effect on treatment control. A longer blade like the #14 covers more skin with each stroke, so it makes sense on flatter areas where you want efficient coverage. A shorter blade like the #10R is easier to steer around curves and tighter facial contours.
In practice, many technicians use the #14 or #10 for broader zones, then switch to the #10R when they need finer manoeuvrability. It’s a bit like using a larger paintbrush for the wall and a smaller one for the corners.
Most of these blades fit a standard No. 3 scalpel handle. That matters more than some people think. Handle fit affects control just as much as blade shape.
Match the blade to client skin type, treatment area, and contraindications
Once you know the blade profiles, the next job is simple in theory but important in practice: match the blade to the client in front of you.
Blade choices for sensitive, mature, and thicker skin
Use the #10R for sensitive, reactive, rosacea-prone, or mature skin. The rounded tip gives you better control on fragile areas. Keep pressure light, use short strokes, and maintain steady skin tension.
Use the #10 or #14 for thicker or oilier skin on broad areas like the cheeks and forehead. The #14 should be reserved for experienced practitioners, since its larger cutting surface calls for a steady angle and controlled pressure.
Blade choice changes your technique. Contraindications decide whether the treatment should happen at all.
| Client Condition | Preferred Blade | Treatment Area Notes | Caution |
|---|---|---|---|
| Sensitive / rosacea-prone | #10R | Cheeks and lateral face | Use shorter strokes and less overlapping |
| Mature / thin skin | #10R | Cheeks, lateral face; reduce work on very thin areas | Avoid over-tensioning and excessive passes |
| Thicker / oilier skin | #10 or #14 | Cheeks and forehead | Confirm practitioner proficiency before using #14 |
When to defer treatment rather than change blades
Do not treat active inflammatory acne, open lesions, sunburn, or rosacea flares. A gentler blade does not make these cases safe.
Wait 6–12 months after oral isotretinoin and at least 1–2 weeks after aggressive chemical peels, microneedling, or laser resurfacing.
If any of these conditions are present, defer the appointment, document the reason, and reschedule once the skin has recovered. Screening and timing are the main safety controls.
Once blade choice is matched to the client, handle fit and sterile workflow become the next control points.
Handle systems, sterile packaging, and safe workflow practices
Once blade selection is locked in, the next part is what happens in the hand and at the treatment station. Handle balance and sterile workflow have a big effect on how steady and repeatable your results are.
Handle fit, grip, and control across a full day of treatments
For standard facial dermaplaning, use a No. 3 stainless steel handle. Longer options like the #3L, #7, and #9 are worth trying if practitioners have larger hands or want a different balance point. Pick a handle that locks the blade in place and feels balanced during use. It should feel steady without forcing a tight grip. If someone has to squeeze the handle too hard, hand and wrist fatigue can build up fast over a full day of treatments.
It also helps to choose a handle with a textured or contoured grip surface. Gloves can get slightly damp during treatment, and a smooth handle may shift mid-stroke. That small slip can increase the chance of a nick. A balanced handle can also cut down on the tiny grip changes needed to hold the right blade angle. On one treatment, that may seem minor. Over several hours, it adds up.
Before setting one option across the clinic, test two or three handle styles. Standardising one or two handle models makes training simpler and helps staff work with tools they already know.
After handle fit, the focus shifts to sterile handling and sharps disposal.
Sterility, sharps disposal, and documentation standards
Use individually wrapped sterile blades. Before use, check the seal, lot number, and expiry date. Store sealed blades in a clean, dry area. Open the blade right before treatment and touch only the non-cutting surfaces. Use one sterile blade per client, then discard it right away after treatment.
To remove the blade from a reusable handle, use a blade remover tool or forceps. Drop it straight into a puncture-resistant sharps container kept within arm's reach of the treatment station. Do not remove a blade by hand, bend it, recap it, or carry it across the room. Sharps containers should meet CSA Z316.6 standards and should be closed and disposed of as biomedical waste once they are three-quarters full.
The table below compares the two main handle and packaging formats Canadian clinics use:
| Option | Control | Workflow/Safety |
|---|---|---|
| Reusable handle + individually wrapped sterile blades | High; the handle's weight helps maintain a steady angle and consistent stroke control | Strong when handles are cleaned and sterilised between clients according to manufacturer instructions and Canadian reprocessing standards |
| Pre-assembled disposable scalpels | Good; less ergonomic customisation than metal handles | Very high; the entire unit is single-use and often includes a protective cover |
Good workflow isn't enough on its own. It also needs to be traceable. Record the blade type, system used, lot number, and expiry date.
Build a blade kit and ordering plan for your clinic
A core blade mix for most Canadian clinics
Once each blade has a clear job, it’s much easier to build a simple stock plan.
For most Canadian clinics, #10R and #10 make the best core pair. Use #10R for most facial work, and keep #10 for broader areas with average-to-thicker skin. Bring in #14 or #10D blades only after practitioners show steady technique and there’s clear client demand for those treatments.
A good place to start is with 25-packs or a sampler bundle. Once your monthly volume is steady, switch to 100-count boxes. Buying in bulk lowers the per-blade cost and cuts down on how often you need to place orders.
To estimate monthly blade needs, use this formula: weekly treatments × 4 × 1.1. Then add a 10% to 20% buffer for seasonal spikes and shipping delays. That extra cushion matters. In Canada, dermaplaning demand often climbs in fall and winter, with another bump in spring. Shipping delays and statutory holidays can also throw off timing, especially if your clinic is outside a major urban centre.
After you’ve forecasted blade volume, price out the support tools that help each treatment run smoothly. Treat the handle, blade remover, and sharps container as fixed accessories that spread their cost across hundreds of treatments. At Beauty Pro Supplies Canada, orders over $199 CAD qualify for free shipping across Canada, so it often makes sense to combine blades and other clinic supplies into one monthly order.
To keep things consistent across the team, use training materials and competency checklists for blade selection, handling, and documentation.
Conclusion: keep blade choice simple, safe, and client-specific
Start with #10R and #10 as your core kit. Add #14 or #10D only when practitioner skill and client demand support it. Reorder based on treatment volume, seasonal patterns, and sterility must-haves: single-use blades, a well-fitted handle, a sharps container within arm’s reach, and documented lot numbers in every client record. Keep inventory short, keep protocols clear, and match the blade to the client in front of you.
FAQs
How many blade types should a new clinic stock?
New clinics should keep a small mix of blades on hand to handle different treatment needs. That usually means stocking the standard #10 surgical blade along with the rounded #10R butter blade.
Beauty Pro Supplies Canada suggests starting with sampler bundles first. After that, packs of 25 are a smart way to keep inventory under control before moving up to boxes of 100 once client demand and treatment protocols are more clear.
Should I choose blades by skin type or treatment area first?
Both matter, but start with the treatment area.
Blade shape plays a big role here. Some blades are made to follow facial contours with more control and precision, which can make certain areas easier to treat.
For example, the 10R has a shorter, rounded tip that works well for smaller, restricted areas. Larger blades like the #14 are a better fit for broader facial dermaplaning.
From there, match the blade’s shape and size to the needs of the procedure so you can get consistent, professional results.
When should a clinic add #14 or #10R blades?
Clinics should stock the #14 blade for standard dermaplaning work that calls for precise control across the skin’s top layers.
It also makes sense to add the #10R blade for smaller, tighter areas of the face. Its rounded bull-nose tip helps reduce the risk of snagging or scratching, which makes it a good fit for detail work around delicate facial contours.
Leave a comment