

Ultimate Guide to Facial Lifting Massage Methods
Facial lifting massage can make skin look less puffy and more toned after just one session, but the effect is short-term. If I want the best result, I need to focus on clean prep, the right glide, light-to-firm pressure by area, and strict safety checks.
Here’s the full article in plain terms:
- I clean the skin and disinfect tools before I start.
- I use a slip product so hands or tools glide without pulling.
- I keep pressure very light around the eyes, medium on the cheeks, and firmer along the jaw.
- I treat the neck differently by moving outward and down, not pulling up.
- I can use manual massage, gua sha, or a facial roller based on the area and client comfort.
- I avoid treatment on sunburn, cold sores, rosacea flare-ups, active breakouts, broken skin, and post-procedure skin.
- I stop at once if I see pain, strong redness, or petechiae.
A few details matter more than anything else. Gua sha is usually held at about 15 to 45 degrees, and strokes are often repeated 3 to 10 times per area. The under-eye area needs the lightest touch because that skin is thin and can react fast.
Face lifting massage Abigail James NO TALKING
sbb-itb-8ec3e54
Quick Comparison
| Method | Pressure | Best For | Feel | Main Watch-Out |
|---|---|---|---|---|
| Manual massage | Light to firm | Full face and neck | Hands-on and targeted | Hand fatigue over time |
| Gua sha | Medium to firm | Jawline, cheeks, brow bone | More sculpted feel | Tool angle and pressure control |
| Facial roller | Light | Cheeks, forehead, under-eyes, neck | Cooling and calming | Easy to overdo passes |
If I keep the skin clean, the strokes controlled, and the screening strict, facial lifting massage can be a safe add-on that gives clients a short-term glow and less puffiness.
Skin Preparation and Treatment Setup
Good prep makes the treatment safer and helps the tool glide evenly. Before the first stroke, the skin should be clean, the tools disinfected, and the right massage supplies and slip medium in place.
How to Cleanse, Sanitise, and Create Proper Glide
Start by securing the client's hair with a headband so the treatment area stays clear. Cleanse the skin with disposable pads or gauze, and use clean hands or gloves as needed.
For tools, stainless steel implements should be cleaned and disinfected between every client. Disinfect metal tools using approved facility protocols. In Canada, professionals should also follow national and provincial governing body requirements.
Next, apply a slip-rich medium like a light oil, balm, or serum. Sweet almond oil and safflower oil are good options for skin that isn't acne-prone. For acne-prone clients, skip heavier oils like olive oil.
Pressure, Direction, and Client Positioning
Use light to medium pressure. Never use deep-tissue pressure on the face.
"You're not going to be doing a deep tissue massage on your face. You want light to medium pressure on a clean face with clean hands." - Julie Clark, Certified Holistic Aesthetician and Founder, Province Apothecary
Pressure should change depending on the area. Around the eyes, use the lightest touch and stay on the orbital bone. On the cheeks, use medium pressure. Along the jawline, a firmer touch works well, and this area often responds well to knuckle-based strokes because it tends to hold tension.
The neck should be treated on its own:
"As for your neck, forget that classic upward move... we generally try not to do that because it can stretch out the skin. Instead, [glide] palms from the centre out and down toward the back." - Julie Clark, Province Apothecary
| Facial Area | Pressure Level | Stroke Direction |
|---|---|---|
| Eye Area | Very light | Outside corner toward the tear duct |
| Cheeks | Medium | Small circles under bone, sweeping toward the ear |
| Jawline | Firm / Knuckles | Upward and outward |
| Forehead | Light to medium | Outward circles toward the hairline |
| Neck | Gentle | Centre outward and downward toward the back |
With the skin prepped and pressure mapped, move into the manual lifting strokes.
Manual Facial Lifting Massage Methods
Once your skin is prepped with massage lotions or oils and you’ve got enough slip, move into slow lifting strokes that follow the natural shape of the face. Keep your strokes upward, and aim to move across fine lines rather than along them.
Jawline, Cheeks, and Neck Lifting Strokes
Start at the jawline. This is often where tension builds, especially from clenching your teeth. Using your knuckles and medium to firm pressure, work in upward and outward strokes from the chin toward the ear. In most cases, this area can handle more pressure than the rest of the face.
Then move to the cheeks. Use your fingertips to make small circular motions under the cheekbones. After that, follow with smooth effleurage sweeps that lift toward the ears. It’s a simple one-two move, but it feels great and helps guide the tissue upward.
For the neck, place your palms at the centre of the neck and glide outward, then down toward the back. Use slow, even passes and keep full-palm contact the whole time.
Under-Eye, Brow, and Forehead Techniques
Use the lightest touch on the most delicate part of the face. The under-eye area needs very light pressure. Gently trace from the outer corner toward the tear duct to help move fluid.
"For eyes... gently tracing the ocular bone from the outside toward the tear duct to drain puffiness. It seems counter-intuitive, but that's how our lymphatic system works." - Julie Clark, Certified Holistic Aesthetician and Founder, Province Apothecary
For the brows, use a light pinch-and-release motion along the brow bone with your thumb and index finger. This can help ease tension from squinting or long hours in front of a screen. On the forehead, switch to small, controlled circles with your fingertips, starting at the brow line and moving upward toward the hairline. Keep each stroke short and controlled to minimise irritation.
Tool-Assisted Methods and How They Compare
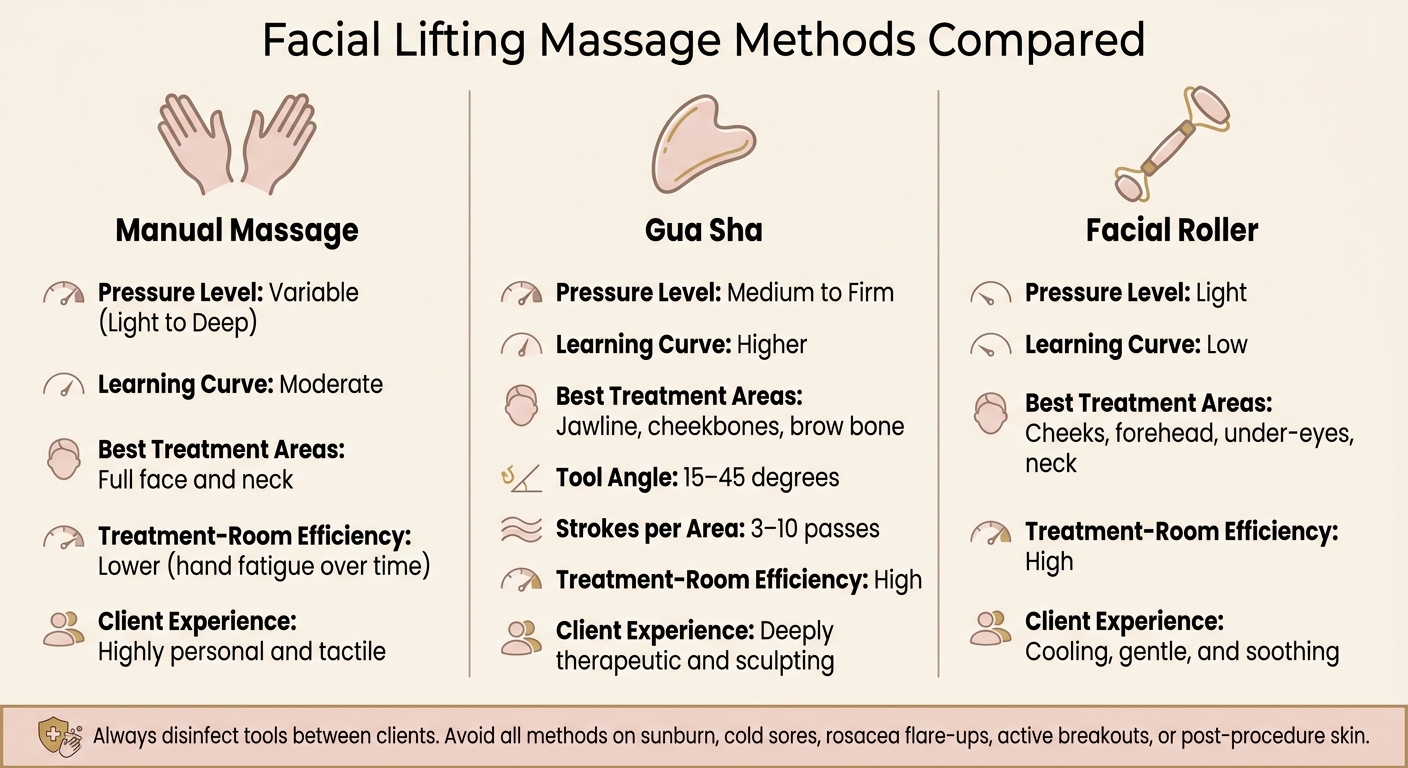
Facial Lifting Massage Methods Compared: Manual vs. Gua Sha vs. Facial Roller
If you want the same lifting paths with less hand fatigue, tools can help stretch out manual strokes. They follow the same lifting lines as your hands, but they shift the feel of the treatment by changing pressure, speed, and how much work your hands have to do.
How to Use Gua Sha and Facial Rollers Correctly
With gua sha, keep the tool at about 15 to 45 degrees on well-slipped skin. That way, the flat side glides instead of dragging or digging in. Start at the centre of the chin and sweep along the jawline toward the ear. Then move from the sides of the nose across the cheek toward the hairline. Use smooth, one-way strokes, and repeat each pass 3 to 10 times per area before moving on.
Facial rollers work a bit differently. Let the weight of the roller do most of the work instead of pushing down with your hand. They tend to suit broader areas, including the cheeks, forehead, and neck, where steady, calming passes feel natural and effective.
On the brow bone and temples, ease up on pressure no matter which tool you use. Under the eyes, keep your touch very gentle and move from near the nose outward so you don't pull at delicate skin. Around the eyes and temples, let the tool's weight guide the motion. Disinfect tools between clients and store them dry in a clean container.
Manual vs. Gua Sha vs. Roller: Method Comparison
Use the table below to match the method to the treatment area and client tolerance.
| Method | Pressure Level | Learning Curve | Best Treatment Areas | Treatment-Room Efficiency | Client Experience |
|---|---|---|---|---|---|
| Manual Massage | Variable (light to deep) | Moderate | Full face and neck | Lower (hand fatigue over time) | Highly personal and tactile |
| Gua Sha | Medium to firm | Higher | Jawline, cheekbones, brow bone | High | Deeply therapeutic and sculpting |
| Facial Roller | Light | Low | Cheeks, forehead, under-eyes, neck | High | Cooling, gentle, and soothing |
Professional Tools and Supply Considerations
In a professional setting, tool quality matters. Your tools need to stand up to repeated use and support proper hygiene. Stainless steel tools are a strong fit for high-volume treatment rooms because they're non-porous, durable, and easy to sanitise. Jade tools give a natural cooling feel and a smooth glide, but they need more careful handling.
For Canadian beauty professionals building or updating a facial massage service menu, Beauty Pro Supplies Canada carries professional gua sha tools, jade rollers, and sanitising supplies.
Once the method is chosen, screen for contraindications before treatment.
Safety, Treatment Planning, and Conclusion
Safety Checks and Contraindications
Once you’ve picked a manual or tool-assisted method, check the skin before you start. If an area is inflamed, broken, or highly reactive, leave it alone. Working over compromised skin can make inflammation worse.
Avoid massage on:
- sunburn
- cold sores
- rosacea flare-ups
- active breakouts
- hypersensitive skin
The table below outlines the most common contraindications and what to do in each case.
| Condition | Action | Reason |
|---|---|---|
| Active acne breakouts | Skip the affected area entirely | Massage can aggravate inflammation and spread bacteria |
| Sunburn or cold sores | Do not treat | The skin is inflamed or broken |
| Active rosacea | Avoid the area | Skin is too reactive and easily aggravated |
| Hyper-sensitive skin | Modify or stop treatment | Risk of irritation and client discomfort |
| Post-procedure skin | Do not treat until fully healed and cleared by protocol | Skin needs recovery time before any manipulation |
If you see redness, pain, or petechiae - tiny red dots from excess pressure - stop right away. The intake form matters, but so do regular check-ins during the session. Skin can change fast, and you want to catch problems early, not after the fact.
Before you add new lifting services, confirm insurer coverage for the treatments you offer.
Key Takeaways for Better Results
Better results usually come down to a few basics done well: clean prep, correct pressure, and steady client check-ins. Use proper glide, work upward and perpendicular to fine lines, and adjust pressure based on the area you’re treating. Safe screening isn’t separate from the lifting effect. It’s part of how you get there.
Results are temporary, so technique and consistency matter most.
FAQs
How long do lifting results last?
How long results last comes down to two things: the method you use and how steady you are with it.
With manual options like ice globes, experts usually suggest using them once or twice a day for six weeks. After that, you move into upkeep mode with three sessions a week.
For lymphatic drainage and other massage methods, regular sessions matter. So does proper hydration. If you want the best shot at keeping results, you need both.
Professional treatments can show visible changes within a few sessions. But in most cases, you’ll still need repeat treatments to keep those results going.
Which facial massage method should I start with?
If you're just getting started, keep it simple: use clean hands and a facial oil or moisturizer for a manual facial massage. Even 10 to 30 seconds can help boost circulation and give your skin a brighter look.
When you want to bring in a tool, lymphatic drainage massage is a good next step. It uses light, rhythmic pressure to help reduce puffiness and leave skin looking more refreshed.
How often can I do facial lifting massage?
Facial lifting massage can fit into your routine every day, and some moves take as little as 10 to 30 seconds.
If you use tools like ice globes, experts suggest one or two sessions a day for six weeks. After that, cut back to three times a week so you don’t overstimulate the skin. Keep each session short, usually 5 to 10 minutes, and stay consistent if you want the results to last.
Leave a comment