

Troubleshooting LED Light Therapy Equipment Issues
LED light therapy devices are widely used in spas and clinics across Canada, but equipment issues can disrupt treatments and client satisfaction. Many problems, like non-functioning NIR LEDs or flickering lights, stem from simple causes such as loose power connections, incorrect adapters, or user errors. Regular maintenance and quick troubleshooting can save time and money while ensuring safety.
Key Takeaways:
- Power Issues: Check adapters, outlets, and cables for damage or loose connections. Use direct wall outlets to avoid voltage inconsistencies.
- NIR LEDs: These emit invisible light, so their operation can’t be visually confirmed. Use device indicators or test for warmth if applicable.
- Physical Damage: Inspect for cracks, frayed wires, or overheating. Avoid folding LED pads sharply or forcing panel joints.
- When to Replace: If repairs exceed 50% of the cost of a new device, consider replacing it, especially for older equipment nearing the end of its lifespan.
Pro Tip: Always follow the manufacturer’s guidelines for troubleshooting, cleaning, and storage to extend equipment life. For persistent issues, contact your supplier or manufacturer for support.
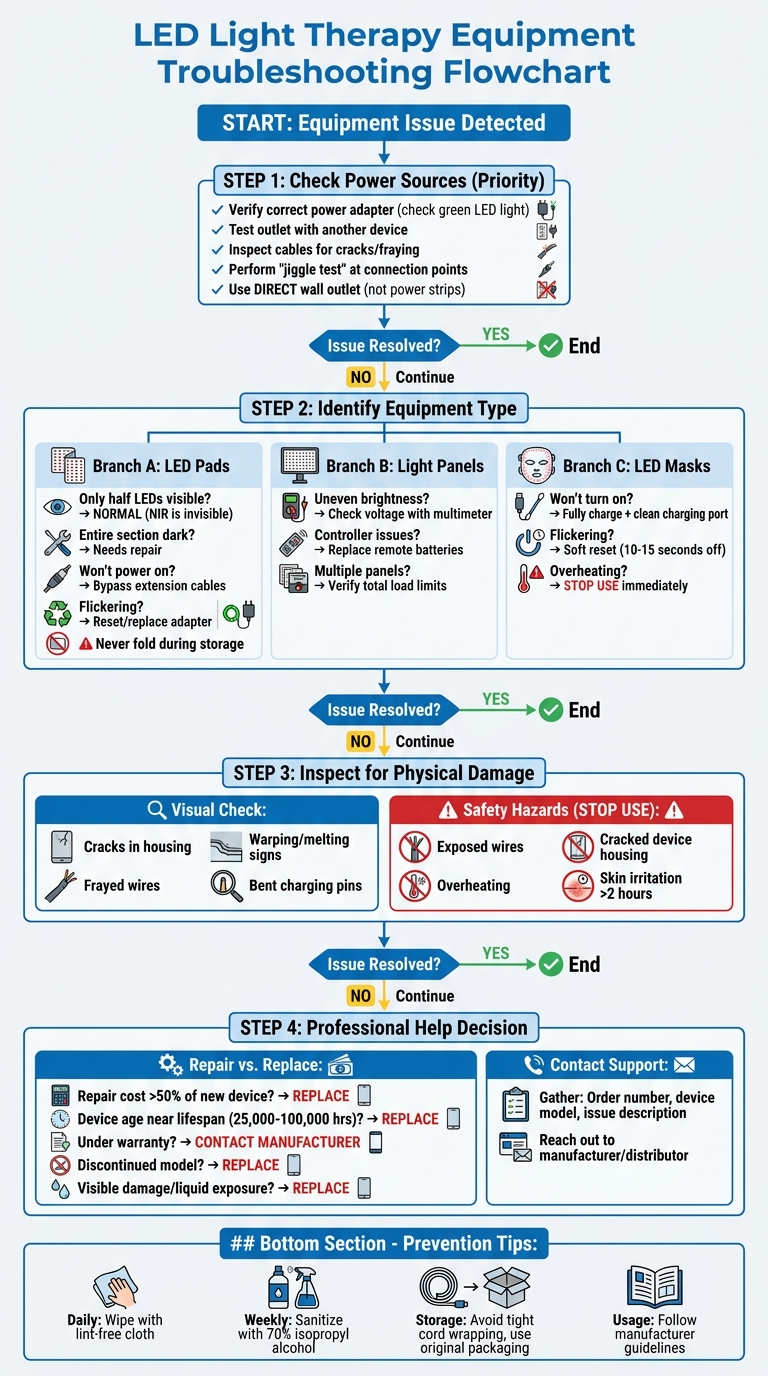
LED Light Therapy Equipment Troubleshooting Flowchart
Why Are My LEDs Not Working? Red Light Therapy Device
sbb-itb-8ec3e54
Check Power Sources and Connections First
Having reliable power is critical for sticking to treatment schedules and keeping clients happy. Most issues with LED light therapy devices come down to power problems. Before jumping to conclusions about equipment failure, take a moment to inspect the power adapter, cables, and outlet. This quick check can often save you time, money, and frustration. Start by verifying the power source and work your way through each component.
Confirm Power Adapter and Outlet Functionality
Begin by testing your power adapter. Many adapters feature a small green LED light on the front - if it’s not illuminated when plugged in, the adapter might be the issue. As Equine-Canine Light Therapy points out:
Confirm that you are using the power adapter that was included with your light therapy order. We all have so many, it is easy to grab an incorrect adapter.
Using the wrong adapter can prevent your device from turning on altogether. To rule out outlet problems, plug in a different device, like a phone charger, to see if it works. If it doesn’t, the issue lies with the outlet, not your LED equipment. For devices that charge via USB-C, watch the indicator lights - a blinking white light usually means it’s charging, while a steady white light signals it’s fully charged.
Examine Cables and Connection Points
Damaged or loose cables are a common culprit behind equipment malfunctions. Carefully inspect the entire power cord for any signs of wear, such as cracks or fraying. Try a "jiggle test" by gently moving the cord at its connection points - both where it plugs into the adapter and the device. If the lights flicker during this test, you may have a loose connection or internal wire damage.
Before opening any device panels, make sure the equipment is completely unplugged. Check all connection points where LED strands attach to the main control system. Over time, vibrations, transport, or frequent use can loosen these connections. Ensure every connector, including USB-C ports, is firmly in place. Once you’ve confirmed the power and connections are secure, focus on ensuring a stable power supply by plugging directly into a wall outlet.
Use Direct Wall Connections
Always connect your LED therapy equipment directly to a wall outlet, rather than using power strips or extension cords. Older transformers, which output between 20W and 50W, often exceed the power requirements of modern devices, which typically operate at around 7W. This mismatch can lead to flickering, outages, or strobing effects, potentially causing discomfort like eye strain or headaches during treatments.
Extension cords and power strips can also create voltage inconsistencies. If your device works when plugged directly into a wall outlet but not through an extension cord, the cord is likely at fault. Additionally, circuits with older dimmer switches can interfere with low-wattage LED devices, as these dimmers are designed for higher loads and may disrupt your equipment’s performance.
Understanding Near-Infrared (NIR) LEDs
When troubleshooting NIR LEDs, it’s important to understand how they work to avoid mistaking normal behaviour for a malfunction. One common mistake is assuming the LEDs are broken simply because their light is invisible. NIR LEDs operate in the 780 nm to 1,200 nm range, which falls outside the visible spectrum (380–700 nm). Since the human eye can’t detect these wavelengths, users may incorrectly believe their device isn’t functioning when no light is visible during use.
How NIR LEDs Function
Near-infrared LEDs differ significantly from visible red LEDs. While red LEDs (630–660 nm) emit a bright, visible glow, NIR LEDs work without producing visible light. As PlatinumLED Therapy Lights explains:
NIR light is technically within the infrared spectrum... this is where the body still perceives energy as light, rather than heat.
At around 800 nm, NIR LEDs deliver therapeutic energy without generating noticeable heat, making it harder to confirm their operation. However, wavelengths above 1,000 nm (Deep NIR) can create a faint warmth, which serves as a useful physical indicator. Knowing these characteristics is essential for accurately assessing NIR LED functionality.
How to Test NIR LEDs
Testing NIR LEDs requires indirect methods since their light is invisible. Start by checking your device's control panel. Advanced systems, like Generation V touch screens or multi-channel dimming displays, will confirm whether the NIR setting is active. Additionally, many devices include a visible red LED next to the NIR bulbs. If this companion light is glowing, it indicates that the invisible NIR light is functioning.
For devices using wavelengths above 1,000 nm, such as 1,072 nm deep NIR, you can place your hand near the treatment area to detect a slight warmth - a sign that the LEDs are working. Devices with "dual-core" or "triple chip" LEDs, which combine visible red and invisible NIR in the same diode, may show some visible light even when the NIR channel is active. Always refer to your product manual for wavelength specifications. If the LEDs operate at 800 nm or higher, their light will be completely invisible under normal conditions.
Inspect Equipment for Physical Damage
A quick visual check can reveal early signs of wear that might lead to performance issues or safety risks. Even minor damage can escalate if left unchecked. If your equipment starts behaving differently, take a closer look or use a skin analysis system to monitor changes. Spotting potential problems early helps you decide whether immediate maintenance is necessary.
Recognize Signs of Equipment Failure
Look closely at the device's housing for cracks, warping, or any signs of melting - these could indicate overheating or physical impact. As reVive Light Therapy points out:
Repeated twisting and stretching can lead to cord damage. Damage can not only hurt the device's function but can also be a personal danger.
Pay extra attention to areas where the cord connects to the power supply. Tight wrapping or frequent bending can strain internal wires and crack the insulation.
For flexible LED pads, avoid folding them sharply. These pads are designed for gentle bending only; folding can permanently damage the internal LED circuits. Light panels, on the other hand, should be inspected at their hinges and joints. Forcing a panel into an unnatural position can harm internal wiring. If you notice any LEDs that appear dark (excluding NIR wavelengths), use your smartphone camera to check if they’re functioning - some LEDs operate in the invisible spectrum.
Identify Safety Hazards
Beyond performance, safety is a critical concern. Stop using your equipment immediately if you see exposed wires, bent pins in charging ports, or cracks in the device housing. GlintSkin underscores this:
We strongly advise against using a cracked LED mask. Even a small crack can compromise the device's integrity, potentially exposing internal components to moisture or affecting light distribution.
If your device overheats or causes skin irritation lasting more than two hours after a short test, stop using it right away. Always check charging cables and connectors for damage or kinks before each session, and use an air blower to clean ports - avoiding liquids near electrical components. For storage, keep the device in its original packaging, away from direct sunlight or heat, to protect the housing from deterioration.
Troubleshooting Different Equipment Types
When it comes to troubleshooting, each type of equipment has its quirks. Knowing the common issues specific to your device can save time and help you avoid unnecessary repairs.
LED Pads
A common concern with LED pads is that only half the LEDs seem to light up. This happens because they use two wavelengths: visible red (660 nm) and near-infrared (850 nm). The near-infrared light is invisible to the human eye, so it's normal to see only the red LEDs. However, if an entire section of LEDs isn't functioning, the pad likely needs repair.
If the pad doesn't power on, try bypassing any extension cables and connect it directly to the adapter. A working adapter should show a green light. Flickering often suggests the adapter needs a reset or replacement. To prevent damage, avoid folding the pad during storage. Equine-Canine Light Therapy advises:
Always ship your light therapy pad lying flat in a box with padding, such as bubble wrap. Never fold your light therapy pad.
Light Panels
Light panels depend heavily on consistent voltage and secure connections. If you notice uneven brightness or colour variations, it could indicate a voltage drop or a loose connection. Use a multimeter to check the output voltage. When connecting multiple panels, ensure the total load stays within the manufacturer's recommended limits.
For issues with the controller, start by replacing the remote batteries and resetting it according to the manual. Double-check all wiring at the connection points to make sure everything is securely connected.
LED Masks
Battery problems are a frequent issue with LED masks. If the mask won't turn on or flickers, fully charge it and inspect for any loose connections. Cleaning the charging port can also help remove dust or debris. For control malfunctions, try a soft reset by turning the device off for 10–15 seconds. As GlintSkin points out:
A quick power cycle can often resolve temporary display issues.
If the mask becomes unusually hot during use, stop using it immediately and contact support. Overheating is a sign of an internal fault that needs professional attention.
When to Get Professional Help
If you’ve tried basic troubleshooting and the problem persists, it might be time to call in the experts. Some situations demand professional assistance to safeguard your investment and ensure client safety.
Deciding Between Repair and Replacement
A good rule of thumb is to compare repair costs to the price of a new device. If repairs exceed 50% of the cost of a replacement, it’s often wiser to opt for a new unit. Even when repair costs are close to that 50% mark, replacing the equipment may save you more in the long run.
Think about the device's age and how much it's been used. High-quality commercial LEDs typically last between 25,000 and 50,000 hours, with some models reaching up to 100,000 hours. If your equipment is nearing the end of its lifespan, repairs might only be a temporary fix. As Matt Barrett, Finance Manager at Capsa Healthcare, explains:
Medical equipment is not like a car where you can squeeze out a few more good years. Equipment gets ricketier over time. Replace the device if downtime is increasing.
Another key consideration is the warranty. If your device is still under warranty, repairs might cost little to nothing. Check your purchase records to confirm the warranty period before paying for any repairs. For older or discontinued models, replacement parts can be hard to find - or prohibitively expensive - making replacement the better choice.
In some cases, immediate replacement is non-negotiable. For example, if you notice visible cord damage, signs of liquid exposure, or overheating, don’t take any risks. As reVive Light Therapy warns:
Never submerge or saturate your device with water or any other fluid. It is an electrical device, and doing so can cause device failure and personal injury.
When repairs aren’t practical or safe, professional assistance ensures your LED equipment remains reliable and safe to use.
Getting Support from Manufacturers or Distributors
When it’s time for repairs or a replacement, reaching out to the manufacturer or distributor can make the process smoother. Many manufacturers offer technical support and warranty services to help resolve issues efficiently. For example, if you purchased your device from Beauty Pro Supplies Canada, their support team can assist with troubleshooting and warranty claims.
Before contacting support, gather all the necessary details to speed up the process. This includes your order number, the device model (e.g., O'melon OMEGA LED or Professional Advanced LED Mask), and a clear description of the issue. Providing this information upfront helps the support team diagnose the problem quickly and recommend the best solution.
For professional-grade devices, you may need to register as a "Licensed Pro" to access technical support. Having your device information ready ensures you get the help you need without unnecessary delays.
Conclusion
Taking care of your LED light therapy equipment starts with simple steps like checking power sources and inspecting cables. Regular upkeep plays a big role in ensuring your devices last longer and perform effectively. As reVive Light Therapy explains:
Maintenance and device care are key to getting the most out of your investment in LED products. How you clean and store it after use will make a huge difference in how long it lasts.
A few easy habits can significantly extend the life of your device. After every session, wipe it down with a lint-free cloth. Once a week, sanitize it with disinfectant wipes or 70% isopropyl alcohol. Proper storage is just as important - avoid wrapping cords tightly around power supplies, as this can lead to damaged wires.
For problems that go beyond routine care, professional help is the way to go. If basic fixes don’t solve the issue, reach out to Beauty Pro Supplies Canada for reliable equipment replacements and warranty support.
Lastly, if you notice visible damage like exposed wires, overheating, or signs of liquid exposure, it’s safer to replace the device rather than attempt repairs.
FAQs
How can I tell if the NIR LEDs are working if I can’t see them?
Near-Infrared (NIR) LEDs operate outside the visible spectrum, so you won't see them with the naked eye. However, you can confirm their activity through indirect methods. One option is to use a smartphone camera (without an IR filter) or a specialised camera to pick up the infrared light they emit. Some devices also include indicator lights or display screens to signal operation. For more precise testing, consult the product manual or reach out to the manufacturer - they might recommend tools like a photodetector for accurate detection.
Why does my device flicker when I use a power bar or extension cord?
Flickering in LED lights typically happens because of power fluctuations or issues with how the LED driver converts AC power into the output needed for the light. Adding a power bar or an extension cord into the mix can sometimes lead to electrical inconsistencies or insufficient power delivery. To minimise flickering, opt for a device equipped with a high-quality driver that operates at a high frequency and has a low flicker percentage. Additionally, try to avoid using extension cords, as they can contribute to power inconsistencies.
When is it safer to replace an LED device instead of repairing it?
If an LED device fails prematurely due to issues like poor-quality components, overheating, or voltage problems that can't be properly fixed, replacing it is often the safer choice. Trying to repair such faults could cause more damage or even pose safety risks, making replacement the more reliable solution.
Leave a comment